Angular components tutorial
In this tutorial, we are going to learn about what is a component and how to create new components in angular.
Note: In the last tutorial, we have created our angular project by using cli
What is a Component?
A component is a reusable piece of UI where we can create once and reuse throughout our app.
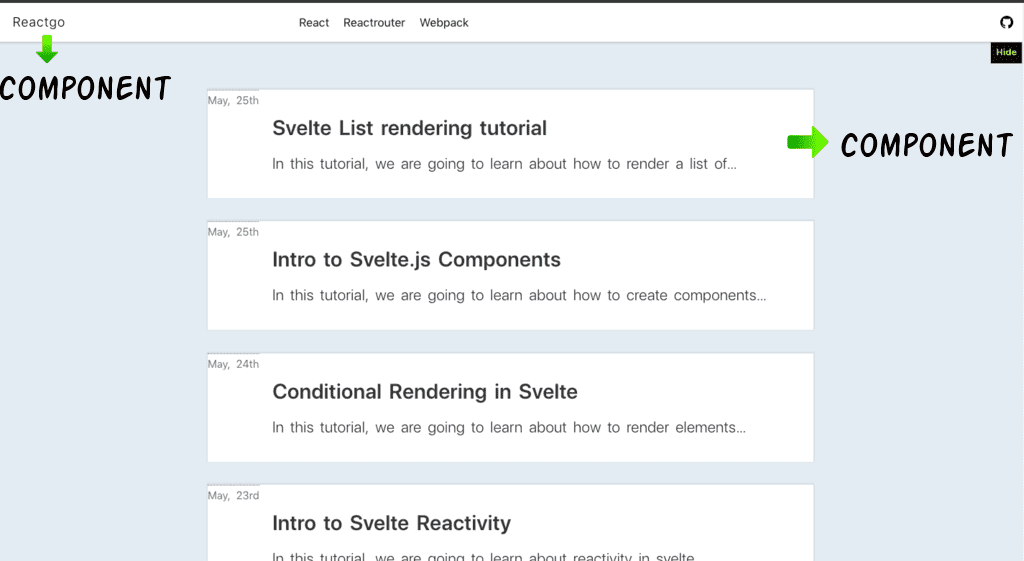
Have you seen in the above image header and blogposts are two different components combined to build this index page.
Creating the angular component
This tutorial assumes that you already created a new angular project by using angular-cli.
Once you successfully created an angular project then open your project by using your favorite code editor.
Now you can see app folder in your src directory these is the place where we create new components by default we can get root angular component called app.component.ts.
To create a component we need to create a new folder with the component name inside app folder.
Let’s create a new folder called header inside your app folder.
Each angular component contains three files which are .html, .css and .ts.
.html : It contains the html markup related to that component.
.css: It contains the styling related code.
.ts: It is a TypeScript file which contains the component logic.
Note: Angular uses the TypeScript which is a superset of the JavaScript if you don’t know about typescript then check out my TypeScript beginners tutorial.
Let’s create a new file called header.component.html inside the header folder and add the below code.
<nav>
   <h1>This is my header</h1>
</nav>
angular uses the naming convention name.component.fileextension
Now, create a new file called header.component.ts inside app folder and add the below code.
import { Component } from '@angular/core';

@Component({
    //html tag of the component
    selector: 'app-header',
    templateUrl: './header.component.html',
    styleUrls: []
})

export class HeaderComponent {

}
In the above code, we first imported a Component decorator from the @angular/core package where it accepts the object as an argument.
selector: The name we added here, is used to add this component inside other component HTML files.
Note: The selector name should start with
app-chooseyourname.
templateUrl: Here we need to add a path of the html file we are using for this component.
styleUrls Here we need to add a css file path for this component.
Declaring component
So far we have created a HeaderComponent but angular doesn’t aware of this component by default, for that, we need to import our HeaderComponent inside app.module.ts file because angular first checks this file to figure out what are available components and modules.
import { BrowserModule } from '@angular/platform-browser';
import { NgModule } from '@angular/core';

import { AppComponent } from './app.component';
import { HeaderComponent } from './header/header.component';
@NgModule({
  declarations: [
    AppComponent,
    HeaderComponent  ],
  imports: [
    BrowserModule
  ],
  providers: [],
  bootstrap: [AppComponent]
})
export class AppModule { }
In the above code, we imported our HeaderComponent and added it to the decalarations array.
Rendering component
To render a component, we need to add a component selector name(app-header) as an HTML tag, inside our app.component.html file because it’s the root component HTML file.
<h1>Hello from app component</h1>

<!--header component we created --><app-header></app-header>
The app-header name we chose it inside our header.component.ts file.
Now run your dev server by using ng serve in your terminal.
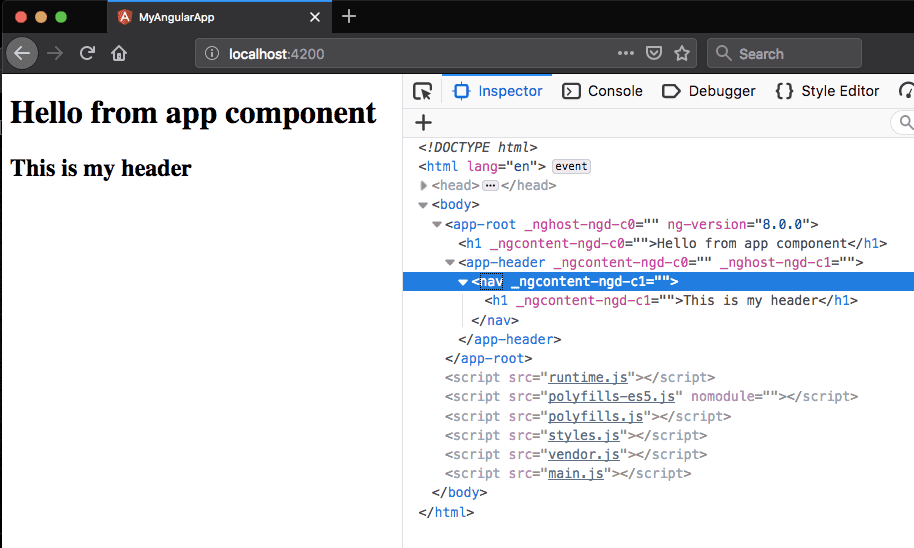
In the above image,This is my header comes from the HeaderComponent.
Creating Components using CLI
We can also use angular-cli to create new components easily instead of doing manual work as we did above.
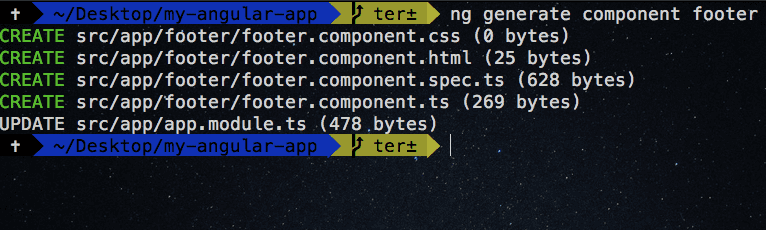
Open your terminal and run the following command.
ng generate component footerThis above command will create a new component called footer inside your app.
Now inside our app folder, we have a new component called footer.
To render this footer component, first, we need to check what is the name of a selector used for this component, which is present inside footer.component.ts file.
import { Component, OnInit } from '@angular/core';
@Component({
selector: 'app-footer', templateUrl: './footer.component.html',
styleUrls: ['./footer.component.css']
})
export class FooterComponent implements OnInit {
constructor() { }
ngOnInit() {
}
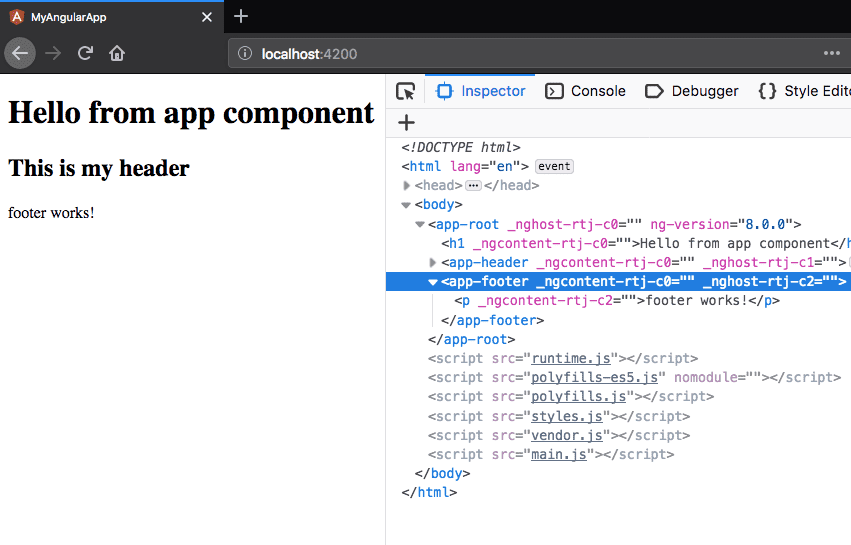
}Now in your app.component.html add the below code to render the footer component.
<h1>Hello from app component</h1>

<!--header component we created -->
<app-header></app-header>
<!--footer component we created using cli --><app-footer></app-footer>
- Share:


