Angular form handling tutorial
In this tutorial, we are going to learn about how to handle the forms in angular by using a template-driven approach.
In template-driven forms we use ngModel directive which creates a two-way data binding between input element and property so that it can correctly update the form elements when a change happens.
To use ngModel directive inside our components, first, we need to configure our app.module.ts file
by importing a FormsModule from @angular/forms package and added it to imports array.
import { BrowserModule } from '@angular/platform-browser';
import { FormsModule } from '@angular/forms';import { NgModule } from '@angular/core';
import { AppComponent } from './app.component';

@NgModule({
  declarations: [
    AppComponent,
    ChildComponent
  ],
  imports: [
    BrowserModule, FormsModule  ],
  providers: [],
  bootstrap: [AppComponent]
})
export class AppModule { }
Input element
Let’s see an example of how to handle the input element data by using ngModel directive.
<form class="center">
  <div>
    <label for="name">Name</label>
    <input [(ngModel)]="name" placeholder="Name" name="name"    id="name" type="text" />  </div>
</form>
In the above code, we added an input element with ngModel directive which is attached to the
name property so that input element value is in sync with the name property.
import { Component } from '@angular/core';

@Component({
  selector: 'app-root',
  templateUrl: './app.component.html',
  styleUrls: ['./app.component.css']
})
export class AppComponent {
  name: string;
  constructor() { }

}
Radio buttons
Let’s see an example of how to handle radio buttons data.
For radio buttons we need to bind the same property with two radio buttons like in below example we have added a ngModel directive with gender property to both Male and Female radio buttons.
<form class="center">
  <div>
    <input [(ngModel)]="gender" name="gender" id="male"
    type="radio" value="Male" />
    <label for="male">Male</label>
    <input [(ngModel)]="gender" name="gender" id="female"
    type="radio" value="Female" />
    <label for="female">Female</label>
  </div>
<p>Gender: {{gender}}</p></form>import { Component } from '@angular/core';
@Component({
selector: 'app-root',
templateUrl: './app.component.html',
styleUrls: ['./app.component.css']
})
export class AppComponent {
name: string;
gender: string;
constructor() { }
}

Checkbox
Single checkbox example
<form class="center">
  <div>
    <input name="newsletter" type="checkbox" id="newsletter"    [(ngModel)]="subscribe" value="newsletter" />    <label for="newsletter">Subscribe to newsletter</label>
  </div>
</form>
In the above code, we have added a directive [(ngModel)]="subscribe" to checkbox so that when a user is checked the subscribe property value is true, for unchecked the value is false.
import { Component } from '@angular/core';

@Component({
  selector: 'app-root',
  templateUrl: './app.component.html',
  styleUrls: ['./app.component.css']
})
export class AppComponent {

  name: string;
  gender: string;
  subscribe: boolean;
  constructor() {

  }
}
Multiple checkboxes example
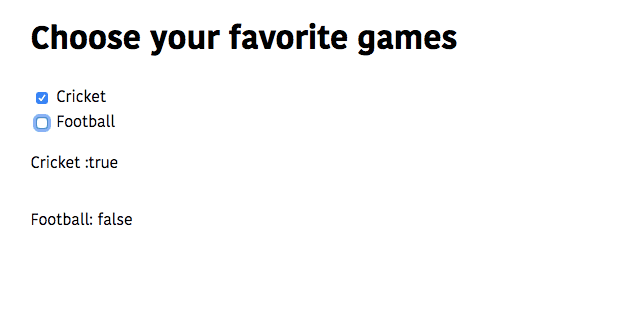
In some cases, we need to handle multiple checkboxes like choosing favorite games or hobbies in such cases we need to create a group of properties and attach them to each checkbox.
<form class="center">
  <h1>Choose your favorite games</h1>
  <div>
    <input name="cricket" type="checkbox" id="cricket"    [(ngModel)]="games.cricket" value="cricket" />    <label for="cricket">Cricket</label>
  </div>
  <div>
    <input name="football" type="checkbox" id="football"    [(ngModel)]="games.football" value="football" />    <label for="football">Football</label>
  </div>

  <!-- output -->
  <p>Cricket :{{games.cricket}}</p>
  <p>Football: {{games.football}}</p>

</form>import { Component } from '@angular/core';
@Component({
selector: 'app-root',
templateUrl: './app.component.html',
styleUrls: ['./app.component.css']
})
export class AppComponent {
name: string;
gender: string;
subscribe: boolean;
games = { cricket: null, football: null, };
constructor() {
}
}
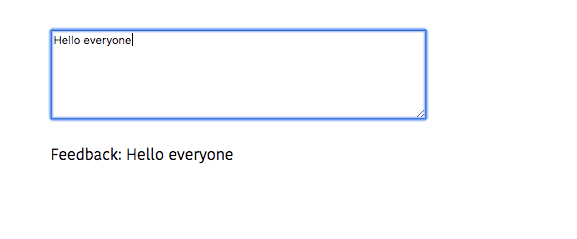
Textarea element example
<form class="center">
  <div>
    <textarea [(ngModel)]="feedback" name="feedback"     placeholder="Enter your feedback">    </textarea>  </div>

  <!-- output -->
  <p>Feedback: {{feedback}}</p>
</form>import { Component } from '@angular/core';
@Component({
selector: 'app-root',
templateUrl: './app.component.html',
styleUrls: ['./app.component.css']
})
export class AppComponent {
name: string;
gender: string;
subscribe: boolean;
games = {
cricket: null,
football: null,
};
feedback: string;
constructor() {
}
}
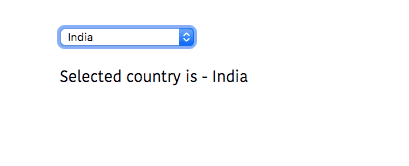
Select element example
Let’s see how to handle select element form data.
In the below code, we have attached ngModel directive to property country so that whatever option
we choose is added to the country property value.
<form class="center">
  <div>
    <select name="country" id="country" [(ngModel)]="country">      <option value="" disabled>Select your country</option>
      <option value="India">India</option>
      <option value="Usa">Usa</option>
      <option value="Uk">Uk</option>
      <option value="Germany">Germany</option>
    </select>
  </div>

  <!-- output -->
  <p>Selected country is - {{country}}</p>
</form>import { Component } from '@angular/core';
@Component({
selector: 'app-root',
templateUrl: './app.component.html',
styleUrls: ['./app.component.css']
})
export class AppComponent {
name: string;
gender: string;
subscribe: boolean;
games = {
cricket: null,
football: null,
};
feedback: string;
country = '';
constructor() {
}
}
Form submission
To submit a form we can do it by adding a button with event handler method but angular
offers us a ngSubmit event property for submitting the form.
<form class="center" (ngSubmit)="onSubmit()">
  <!-- your form elements goes here -->
  <button type="submit">Submit</button>
</form>- Share:


