A beginners guide to Vue Apollo client tutorial
In this tutorial, we are going to learn how to fetch and update the data from the graphql APIs in Vue using Apollo client.
Note: We are using the GitHub graphql API for the learning purposes.
if you stuck anywhere in this tutorial, then please refer to the final code repository on GitHub
Creating Vue app
This tutorial assumes that you already installed vue cli in your pc.
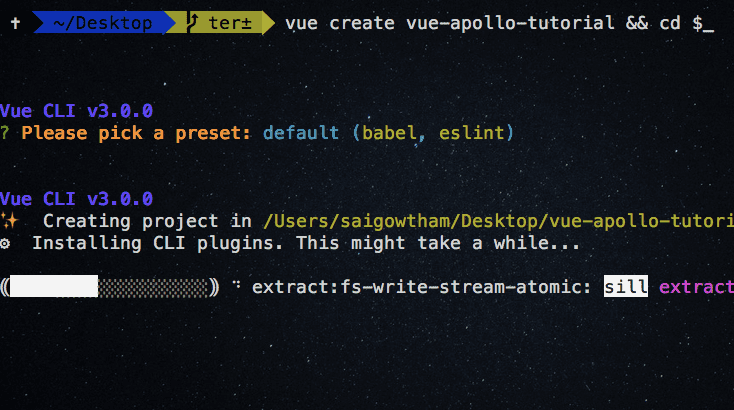
Let’s create a new vue app by running the following command in your terminal.
vue create vue-apollo-tutorial && cd $_This above command will download the vue app related files inside your vue-apollo-tutorial folder and it changes your current working directory to vue-apollo-tutorial.
Now we need to install Apollo client packages from the npm.
Installing apollo client packages
npm i vue-apollo apollo-boost graphqlThis above command will download the three packages which are vue-apollo,apollo-boost, and graphql.
Connecting with GitHub GraphQL API
Let’s connect our vue app with the GitHub Graphql API.
Open your GitHub account and navigate to settings then click on developer settings and generate personal access token by selecting the fields.
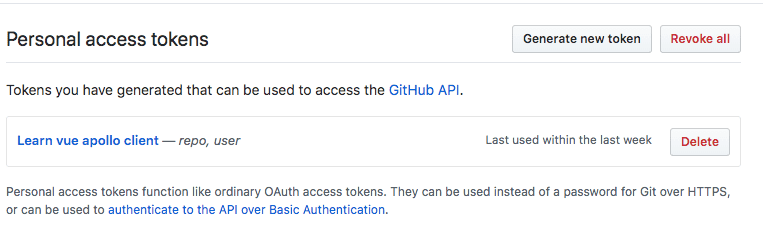
Note: copy the personal access token and save it in your pc because the token is only visible once.
Now open your main.js file and add the following code with your personal access token example Bearer 2834903039-3-389-032.
import Vue from 'vue'
import VueApollo from 'vue-apollo';
import ApolloClient from 'apollo-boost'
import App from './App.vue'

Vue.use(VueApollo);

//creating apollo client
const client = new ApolloClient({  uri: "https://api.github.com/graphql",  request: operation => {    operation.setContext({      headers: {        authorization: 'Bearer '+'your-personal-access-token'      },    });  }});
const apolloProvider = new VueApollo({
  defaultClient: client,
})

//injecting apolloProvider to root vue instance
new Vue({
  render: h => h(App),
  apolloProvider,
}).$mount('#app')
Here we import an ApolloClient constructor from the apollo-boost package and instantiate the client by passsing the uri.
uri: The graphql endpoint we are using to fetch the data.
request: For every request, we are sending the authorization header to verify the present user.
Now we can send queries and mutations to our graphql endpoint from any vue component.
Queries
In GraphQL Query means to get the data from the API.
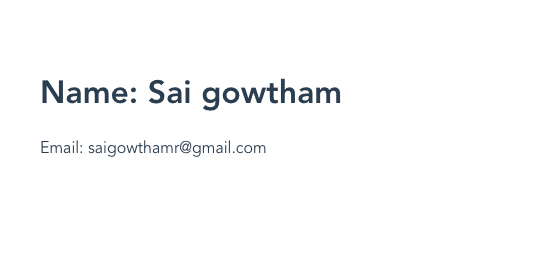
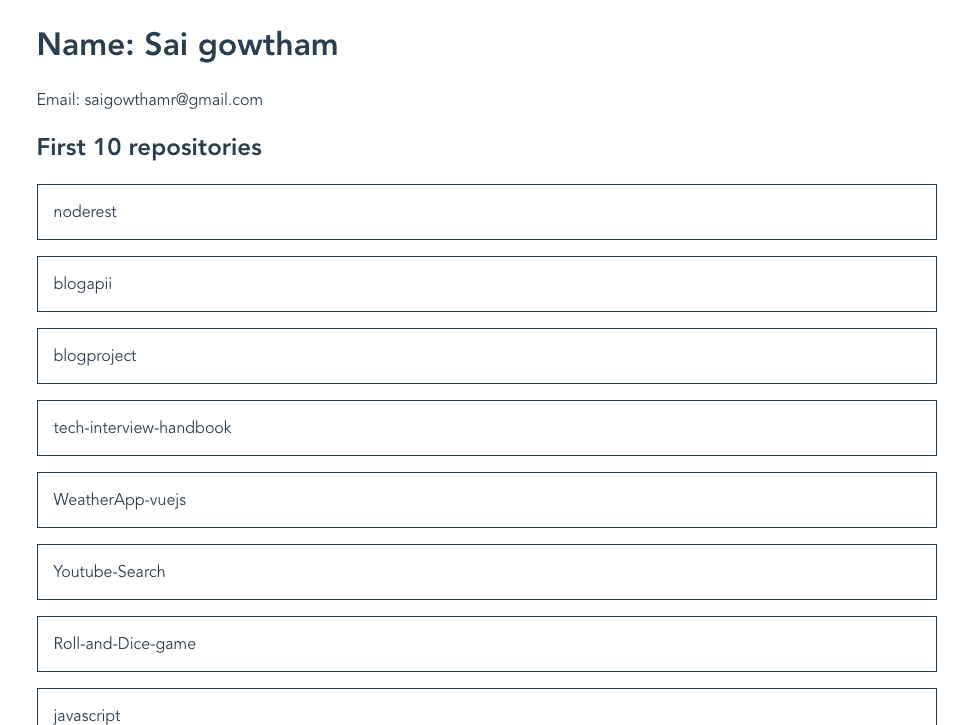
Let’s write our first query which helps us to get our GitHub name and email.
<template>
  <div id="app">
    <div v-if="$apollo.loading">Loading..</div>    <div v-else>      <h1>Name: {{viewer.name}}</h1>
      <p>Email: {{viewer.email }}</p>
    </div>
  </div>
</template>

<script>
import { gql } from "apollo-boost";export default {
  data: function() {
    return {
        //query data is added      viewer: {}
    };
  },  apollo: {      //this query will update the `viewer` data property    viewer: {      query: gql`        {          viewer {
            name
            email
          }
        }`
    }
  }
};
</script>
In the above code we have added a query inside apollo object where viewer property is same in apollo object and data object so that when our query is resolved viewer data property is
updated with the result we got from the api.
Now we can see name and email is rendered on the screen.
Apollo client devtools
Let’s install the Apollo client dev tools from the chrome web store.
Once you successfully installed we can access the GraphiQL playground from the dev tools tab. By using GraphiQL playground we can send queries and mutations to the server.
Now open your chrome dev tools and click on apollo tab you will see a GraphiQL playground.

The left side data on the image is the query and right side data is the result.
Passing arguments to queries
We can also filter queries by passing the arguments.
create a new file called my-repos.vue in your components folder and add the below code.
<template>
  <div class="repos">    <div v-if="$apollo.loading"></div>
    <div v-else>
      <h2>First 10 repositories</h2>
      <!-- looping through viewer repos -->
      <ul v-for="repo in viewer.repositories.edges" :key="repo.node.id">        <li>{{repo.node.name}}</li>      </ul>    </div>
  </div>
</template>

<script>
import { gql } from "apollo-boost";
export default {
  data: function() {
    return {
      viewer: []    };
  },
  apollo: {
    viewer: {      query: gql`       {          viewer {            repositories(first: 10) {              edges {                node {                  id
                  name
                }
              }
            }
          }
        }`
    }
  }
};
</script>
In the above code, we are querying for the viewer repositories by passing an argument first:10 so that we can only get the first 10 repositories.
Passing arguments using Query variables
So far we are passing the static values to the arguments let’s replace the static values with the dynamic values by using query variables.
query MyRepos($first: Int!) {
  viewer {
    repositories(first: $first) {
      edges {
        node {
          id
          name
        }
      }
    }
  }
}
The query variable names are always preceding by a $ character.
The static value is replaced by a $first variable name so that we can pass the value to query dynamically by using a $first variable.
Let’s see how we can pass the variables inside our my-repos component.
<template>
  <div class="repos">
    <div v-if="loading">Loading..</div>
    <div v-else>
      <h2>First 10 repositories</h2>
      <!-- looping through viewer repos -->
      <ul v-for="repo in viewer.repositories.edges" :key="repo.node.id">
        <li>{{repo.node.name}}</li>
      </ul>
    </div>
  </div>
</template>

<script>
import { gql } from "apollo-boost";
export default {
  data: function() {
    return {
      viewer: [],
      loading:true
    };
  },
  apollo: {
    viewer: {
      query: gql      `query MyRepos($first: Int!) {
          viewer {            repositories(first: $first) {
              edges {
                node {
                  id
                  name
                }
              }
            }
          }
        }
      `,
      variables: { first: 10 },      result:function({data}){
        if(data){
          this.loading=false
        }
      }
    }
  }
};
</script>
In the above code, we have added a variables to apollo object so that $first in the query is repalced with 10.
Mutations
To modify the data in GraphQL we need to send mutations instead of queries.
Mutations purpose is to add or remove or update the data.
Example of adding a star to your GitHub repository.
mutation AddStar($repoid:ID!){
   addStar(input:{starrableId:$repoid}){
    starrable{
      viewerHasStarred
    }
  }
}
once the mutation is completed it returns the data back from the backend.
the output from the backend
{
  "data": {
    "addStar": {
      "starrable": {
        "viewerHasStarred": true
      }
    }
  }
}
Let’s create a new file called add-star.vue.
Now we are implementing the Addstar component which helps us to add the star to your repositories.
Vue apollo package also provides us <ApolloMutation> component which is used to send the mutations to the graphql API.
In <ApolloMutation> component, we need to pass the mutations and variables as a prop and use the vue scoped slot feature to pass down the results.
<template>
  <div class="addStar">
    <ApolloMutation :mutation="addStar" :variables="{repoid:id}"     @done="onDone">      <template slot-scope="{ mutate, loading, error }">        <div v-if="loading">Loading</div>
        <button :disabled="loading" @click="mutate()">Add star</button>
        <p v-if="error">An error occured: {{ error }}</p>
      </template>
    </ApolloMutation>
  </div>
</template>

<script>
import { gql } from "apollo-boost";
export default {
  props: ["id", "refetch"],
  data: function() {
    return {
      addStar: gql`
        mutation AddStar($repoid: ID!) {          addStar(input: { starrableId: $repoid }) {            starrable {              viewerHasStarred            }          }        }
      `
    };
  },
  methods: {
    onDone: function() {
      this.refetch();
    }
  }
};
</script>
Here we passed a addStar mutation and vairables as a prop to <ApolloMutation> component.In scoped slot we can access the mutate function ,error and loading variables.
Once the mutation is completed ApolloMutation component is invoking the @done event so that we are passing the onDone method which helps us to call the refetch method so that we can see the updated data in the UI.
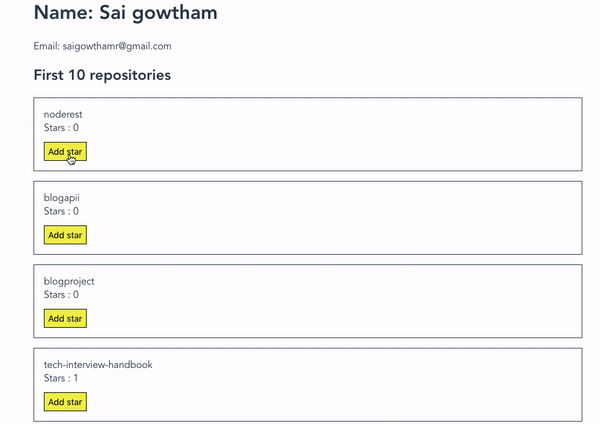
Update the my-repos.vue file by adding a AddStar component.
<template>
  <div class="repos">
    <div v-if="loading">loading</div>
    <div v-else>
      <h2>First 10 repositories</h2>
      <!-- looping through viewer repos -->
      <ul v-for="repo in viewer.repositories.edges" :key="repo.node.id">
        <li>{{repo.node.name}}</li>
        <li>Stars : {{repo.node.stargazers.totalCount}}</li>
        <!-- add star component only renders when viewer is not starred -->        <li v-if="!repo.node.viewerHasStarred">          <AddStar :id="repo.node.id" :refetch="refetch"/>        </li>      </ul>
    </div>
  </div>
</template>

<script>
import { gql } from "apollo-boost";
import AddStar from "./add-star";export default {
  data: function() {
    return {
      viewer: [],
      loading: true
    };
  },
  components: {    AddStar  },  apollo: {
    viewer: {
      query: gql`
        query MyRepos($first: Int!) {
          viewer {
            repositories(first: $first) {
              edges {
                node {
                  id
                  name
                  viewerHasStarred
                  stargazers {
                    totalCount
                  }
                }
              }
            }
          }
        }
      `,
      result: function({ data }) {
        if (data) {
          this.loading = false;
        }
      },
      variables: { first: 10 }
    }
  },
  methods: {
    refetch: function() {
      this.$apollo.queries.viewer.refetch();    }
  }
};
</script>
Here we added an AddStar component with a conditional statement so that it will only render when a viewer is not starred at.
Let’s test our app now by clicking on Add star button.
- Share:


