A beginners guide to Vue unit testing with Jest
In this tutorial, we are going to learn about how to write unit tests for vue components using jest
and vue-test-utils.
What is Jest?
Jest is a JavaScript unit testing framework created by facebook which includes a lot of features like snapshot testing, code coverage, etc.
Vue-test-utils
The vue-test-utils library provides us helper methods by using that we can mount and interact with the Vue components easily.
Getting started
First, we are going to create a new vue project by using Vue CLI.
Open your terminal and run the following command.
vue create vue-testingIt will prompt with two options, select manually select features and hit enter.
Vue CLI v3.0.0
? Please pick a preset:
  default (babel, eslint)
❯ Manually select features
Now, you need to select unit testing option by using the Space key.
Vue CLI v3.0.0
? Please pick a preset: Manually select features
? Check the features needed for your project:
 ◉ Babel
 ◯ TypeScript
 ◯ Progressive Web App (PWA) Support
 ◯ Router
 ◯ Vuex
 ◯ CSS Pre-processors
 ◉ Linter / Formatter
❯◯ Unit Testing
 ◯ E2E Testing
choose ESLint with error prevention only option and hit enter.
Vue CLI v3.0.0
? Please pick a preset: Manually select features
? Check the features needed for your project: Babel, Linter, Unit
? Pick a linter / formatter config: (Use arrow keys)
❯ ESLint with error prevention only
  ESLint + Airbnb config
  ESLint + Standard config
  ESLint + Prettier
Now, choose Jest option and hit enter.
Vue CLI v3.0.0
? Please pick a preset: Manually select features
? Check the features needed for your project: Babel, Linter, Unit
? Pick a linter / formatter config: Basic
? Pick additional lint features: Lint on save
? Pick a unit testing solution:
  Mocha + Chai
❯ Jest
It will ask for where to place configurations choose package.json.
? Where do you prefer placing config for Babel, PostCSS, ESLint, etc.?
  In dedicated config files
❯ In package.json
Final question type N and hit enter and vue cli starts creating our project with jest and vue-test-utils.
Run the below command in your terminal to change your current working directory.
cd vue-testingNow open your vue-testing project in your favorite code editor, you will see a tests folder which is generated by the vue cli delete this folder.
Remove everything from a App.vue file and add the below code.
<template>
  <div id="app">
    <h1>{{msg}}</h1>  </div>
</template>

<script>
export default {
  data: function() {
    return {
      msg: "Hello"
    };
  }
};
</script>
This is our App component with h1 element and msg data property.
Writing our first unit test
Now we are writing a unit test for our App component.
create a new folder called __tests__ in your root directory, because by default jest looks for __tests__ folder in your vue project and runs all tests present inside that folder.
create a new file called App.test.js inside __tests__folder and add the below code.
.test.js is an file extension.
import App from '../src/App.vue'
import { mount } from '@vue/test-utils';
describe('Testing App component', () => {
    it('checks textcontent to Hello ', () => {
        const wrapper = mount(App); //returns instance of the component.        //accessing dom element and checks textcontent
        expect(wrapper.element.textContent).toBe('Hello');    })
})
In the above code, we first imported the App component and mount method.
The mount method takes a component as an argument and returns its vue instance and dom node.
Let’s run our test by using the below command.
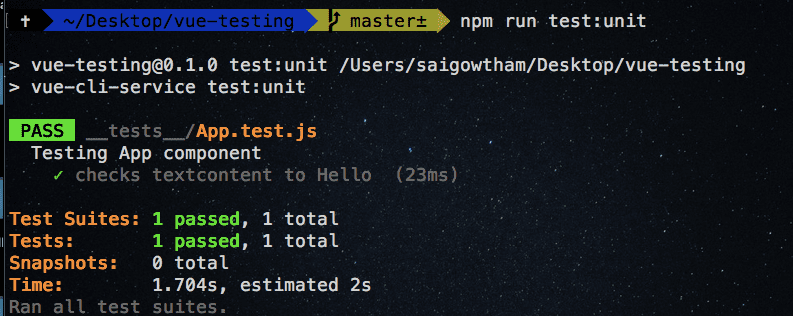
npm run unit:testNow you will see a pass check like in the below image.
Watch mode
Now if we create another test in our vue app or if we update our existing tests, we need to re-run the test command again and again, by using watch mode jest automatically re-run the tests if something has changed in the test files.
Open your package.json file and replace your test:unit script with below script.
"test:unit": "vue-cli-service test:unit --watch"Writing our second test
Let’s write our second test.
import App from '../src/App.vue'
import { mount } from '@vue/test-utils';

describe('Testing App component', () => {
    it('checks textcontent to Hello ', () => {
        const wrapper = mount(App);
        expect(wrapper.element.textContent).toBe('Hello');
    })

    it('checks textcontent to Hi', () => {
        const wrapper = mount(App, {
            data: function () {
                return {
                    msg: "Hi" // replacing msg property value with `Hi`                }
            }
        })
        expect(wrapper.element.textContent).toBe('HI');
    })
})
In our second test, we are checking for textContent to be Hi by passing a data option as a second argument to mount method.
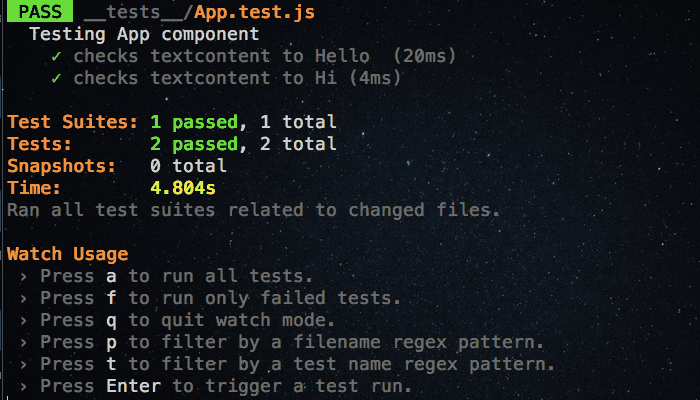
Now in your terminal, you’ll see two tests are passing.
Further, you can check out vue-test-utils website to know more about helper methods.


