Getting started with Semantic UI React
In this tutorial, we are going to learn about how to use semantic ui framework in react apps.
What is Semantic UI ?
Semantic ui is a development framework which helps us to create beautiful,resposive layouts using human-friendly HTML.
Semantic ui is completely designed with em units which makes responsive sizing.
Semantic UI react
Semantic UI react provides us react components that implements Semantic UI design.
Getting started
First, we need to create a new react app by using the create-react-app command line tool.
Open your terminal and run following commands.
npx create-react-app react-semanticNext, we need to change our working directory by using below commands.
cd react-semantic
npm start
npm start is used to run the development server.
Let’s install the semantic ui react framework by running the below commands.
npm i semantic-ui-react
npm i semantic-ui-css
Now open your react-semantic folder in your favorite code editor.
Navigate to your index.js file and add the below highlighted line.
import React from 'react';
import ReactDOM from 'react-dom';
import './index.css';
import 'semantic-ui-css/semantic.min.css'import App from './App';


ReactDOM.render(<App />, document.getElementById('root'));
Here we imported semantic UI css to our App.
Let’s design Navigation bar for our App using semantic UI react components.
Inside your src folder create a new file called navigation.js and add the below code.
import React, { useState } from 'react';
import { Menu } from 'semantic-ui-react'
function NavigationBar() {

    return (
        <Menu pointing secondary>            <Menu.Item  name='home' href="/somelink"/>
            <Menu.Item  name='posts' href="/somelink"/>            <Menu.Item  name='contact' href="/somelink"/>
        </Menu>
    )
}

export default NavigationBar;
In the above code, we first imported the Menu component from the semantic-UI-react.Inside NavigationBar component, we wrapped Menu.Item components with Menu component so that semantic UI gives us back an html div with 3 link tags.
Inside Menu.Item component we passed a name prop and href prop.
- name: Link title
- href: Link address
Now inside the App component add the NavigationBar component by importing it from
navigation.js file.
import React from 'react';
import './App.css';
import NavigationBar from './navigation';
function App() {

  return (
    <div className="App">
      <NavigationBar />    </div >
  );
}

export default App;
Add these styles to your App.css file
.App {
  max-width: 1000px;
  margin: 0 auto;
  padding: 2rem;
}


.form,.posts{
  margin-top: 3rem;
}
Now open your terminal and run the below command to start your development server.
npm start
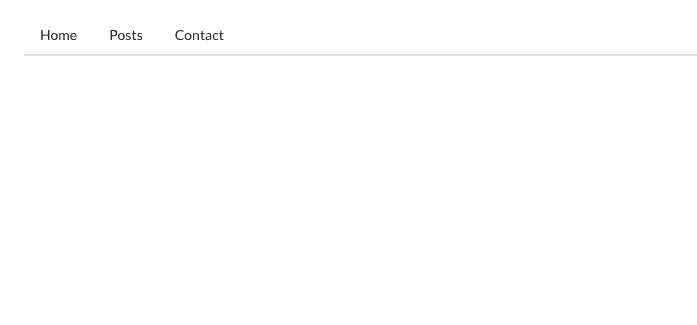
Adding icons to navbar
We successfully created a Navigation bar for our app, semantic ui can also provide us inbuilt icon packages so that now we are adding icons to our Menu.item component by using icon prop.
update your navigation.js file with below code.
import React, { useState } from 'react';
import { Menu } from 'semantic-ui-react'

function NavigationBar() {

    return (
        <Menu pointing secondary>
            <Menu.Item icon="home" name='home' href="/somelink"/>            <Menu.Item icon="box" name='posts' href="/somelink"/>            <Menu.Item icon="address book" name='contact'            href="/somelink"/>
        </Menu>
    )
}

export default NavigationBar;
after adding icons our NavigationBar look like below image.
![]()
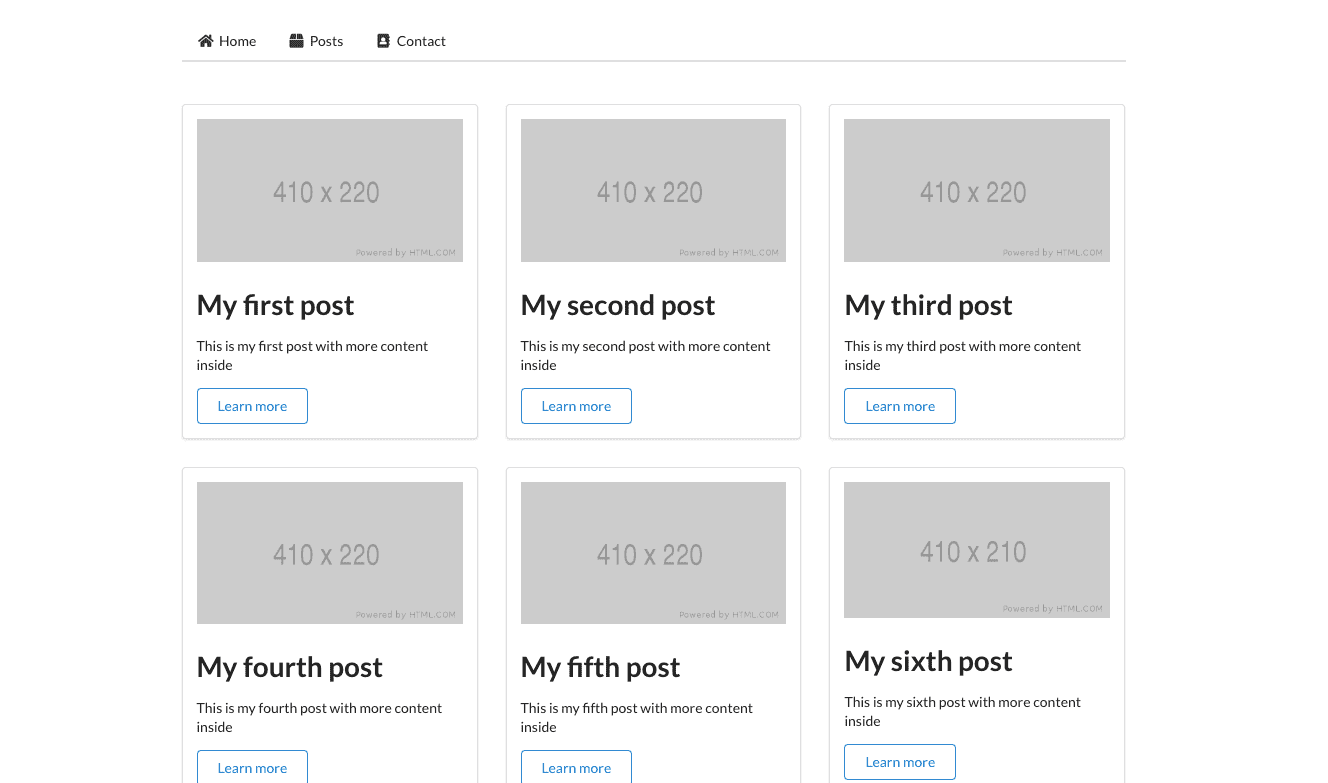
Grid
Semantic UI also provides us Grid component which helps us to create responsive grid layouts in our app, so that it can look better in all devices.
create two files called dummy-posts.js and post.js inside your src folder.
const posts = [

    {
        title: "My first post",
        excerpt: "This is my first post with more content inside",
        image: "https://via.placeholder.com/410x220"
    },
    {
        title: "My second post",
        excerpt: "This is my second post with more content inside",
        image: "https://via.placeholder.com/410x220"
    },
    {
        title: "My third post",
        excerpt: "This is my third post with more content inside",
        image: "https://via.placeholder.com/410x220"
    },
    {
        title: "My fourth post",
        excerpt: "This is my fourth post with more content inside",
        image: "https://via.placeholder.com/410x220"
    },
    {
        title: "My fifth post",
        excerpt: "This is my fifth post with more content inside",
        image: "https://via.placeholder.com/410x220"
    },
    {
        title: "My sixth post",
        excerpt: "This is my sixth post with more content inside",
        image: "https://via.placeholder.com/410x210"
    }
]
export { posts }import React from 'react';
import { Segment, Header, Grid, Image,Button } from 'semantic-ui-react'import { posts } from './dummy-posts';
function Posts() {
return (
<div className="posts">
<Grid centered columns={3} doubling> {posts.map(post =>
<Grid.Column key={post.title}> <Segment>
<Image src={post.image} /> <Header as="h1">{post.title}</Header> <p>{post.excerpt}</p> <Button primary basic as="a" href="/"> Learn more</Button> </Segment>
</Grid.Column>)}
</Grid>
</div>
)
}
export default Posts;In the above code, we imported 5 components from the semantic-ui-react.
In Grid Component we passed three props centered,columns, doubling.
centered: It makes all grid items in the center.
columns: we need to specify how many columns we need initially.
doubling: it helps us to automatically adjust the grid item widths according to the device sizes (Mobile, tablet).
<Segment> Component is used to group particular items.
<Image> component helps us to add the images.
In <Header> component we added as prop value to h1 so that we can render h1 html element (supporting values h1,h2,h3,h4,h5,h6).
Now inside App component add the Posts component by importing it from
posts.js file.
import React from 'react';
import NavigationBar from './navigation';
import Posts from './posts';import './App.css';

function App() {

  return (
    <div className="App">
      <NavigationBar />
      <Posts />    </div >
  );
}

export default App;
output:
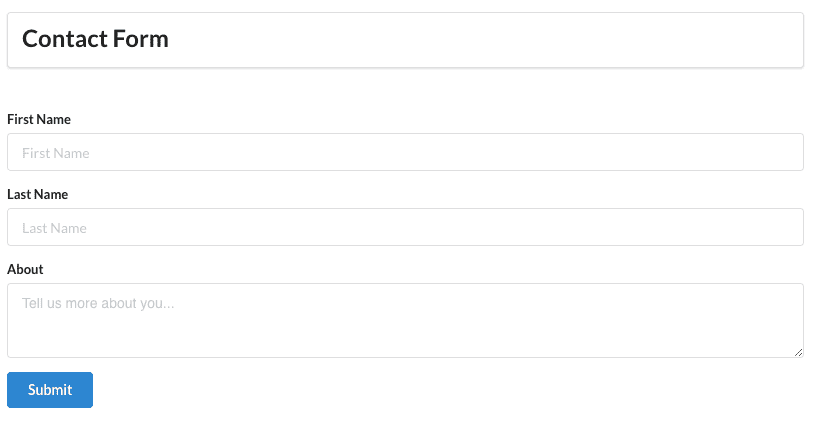
Contact Form
Let’s create a contact form using semantic ui Form,Form.Field components.
create a new file called contact.js in your src folder and add the below code.
import React from 'react'
import { Button, Form, Segment, Header } from 'semantic-ui-react'
function ContactForm() {
    return (
        <div className="form">
            <Segment>
                <Header as="h2">Contact Form</Header>
            </Segment>
            <Form>
                <Form.Field>
                    <label>First Name</label>                    <input placeholder='First Name' />                </Form.Field>
                <Form.Field>
                    <label>Last Name</label>                    <input placeholder='Last Name' />                </Form.Field>
                <Form.TextArea label='About'
                placeholder='Tell us more about you...' />
                <Button type='submit' color="blue">Submit</Button>            </Form>
        </div>
    )
}
export default ContactForm;
Inside Form.Field component we added label and input field.
Form.TextArea component will accept the label, placeholder prop
In Button component we passed color=blue so that we can get a button with the blue color.
- Share:


