React Testing tutorial for beginners using jest
In this tutorial, we are going to learn about how to test react components by using a jest testing framework.
What is Jest?
Jest is a JavaScript testing framework created by Facebook it works with React, Angular, Vue.
Getting started
First, we need to create a new react app by using create-react-app
command line tool.
Run the below command to install react app.
npx create-react-app react-testingThis above command will download the react related files in ‘react-tesing’ folder.
change your current working directory by running following command.
cd react-testingIf we create a new app by using create-react-app jest is already included in our react project.
Now open your ‘react-testing’ folder in your favorite code editor.
create a new folder called __tests__ in your src folder because by default jest looks for __tests__ folder in your project and runs all tests present inside that folder.
Delete App.test.js file in your src folder.
Now remove everything present inside your App.js file and add the below code.
import React, { Component } from 'react';

class App extends Component {
  render() {
    return (
      <div className="App">
        <button>Show</button>
      </div>
    );
  }
}
export default App;
This a simple App component with Show button.
Writing Our first Test
Let’s write our first snapshot test by using jest.
What is SnapShot test ?
A typical snapshot test case for a react app renders a UI component, takes a snapshot then it checks against the reference snapshot file created by the jest if both snapshots don’t match our tests will fail.
We need to install a new package called react-test-renderer which helps to grab a snapshot for our component.
npm i -D react-test-rendererNow create a new file called App.test.js in your __tests__ folder.
import React from 'react';
import App from '../App';
import { create } from 'react-test-renderer'

describe('My first snapshot test',()=>{
    test('testing app button', () => {
    let tree = create(<App />)
    expect(tree.toJSON()).toMatchSnapshot();
  })
})
In the above code, we have imported our App component and create method from react-test-render
package.
Let’s run our test by using below command.
npm run test
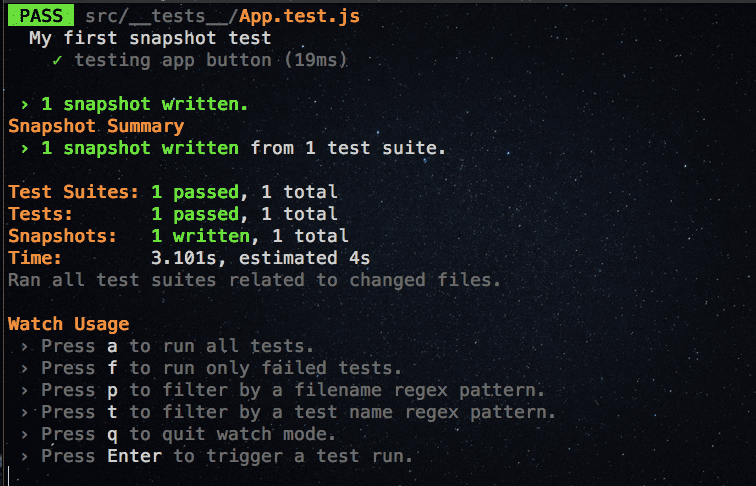
This command will create a snapshots folder with the snapshot file if we try to change our button name to Hide in App component jest re-runs our test and checks against with previously created snapshot if both snapshots don’t match our tests will fail.
Let’s make our test fail by changing our button name.
import React, { Component } from 'react';

class App extends Component {
  render() {
    return (
      <div className="App">
        <button>Hide</button>
      </div>
    );
  }
}
export default App;
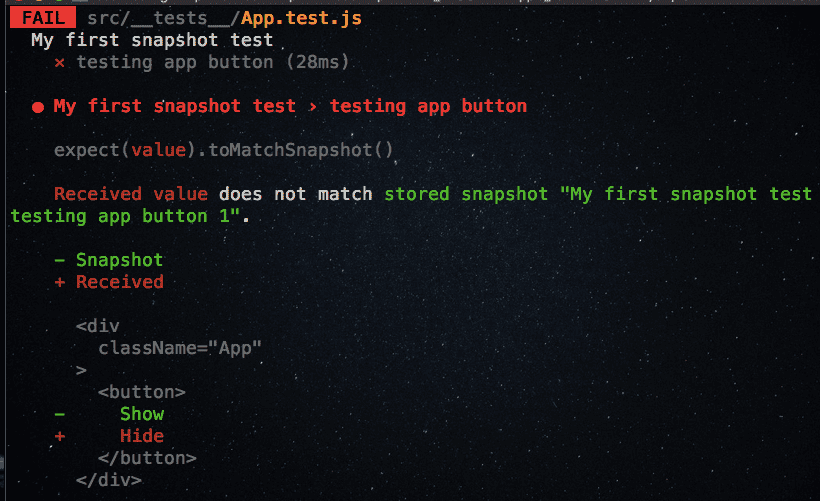
Have you seen in above image jest clearly mentioning received value doesn’t match with a stored snapshot?
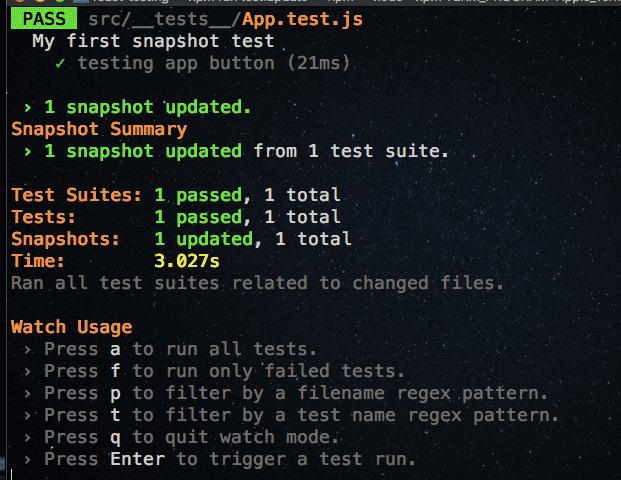
If we need to update the existing snapshot then we need to add a new script to our package.json file.
"test:update": "react-scripts test --updateSnapshot",Let’s run below command to update our previously created snapshot.
npm run test:update
Interaction with our component
So far we didn’t add any state or methods to our App component let’s add the state and methods to our Component.
Update your App.js file with the below code.
import React, { Component } from 'react';

class App extends Component {

  state = {
    isActive: false
  }

  handleClick = () => {
    this.setState({ isActive: !this.state.isActive })
  }


  render() {
    return (
      <div className="App">
        <button onClick={this.handleClick}>
          {this.props.show ? "Hide" : "Show"}
        </button>
      </div>
    );
  }
}
export default App;
Instead of manually changing the button name we have added a state to our App component.
Let’s use the jest snapshot feature and react-test-renderer to interact with our Component and write tests for, is button changing its name correctly or not.
import React from 'react';
import App from '../App';
import { create, update } from 'react-test-renderer'

describe('My first snapshot test', () => {
    test('testing app button', () => {
        let tree = create(<App />)
        expect(tree.toJSON()).toMatchSnapshot();
    })
})


describe("Changing our button name to Hide", () => {

    test('toggle the button', () => {
        let tree = create(<App />);

        let instance = tree.getInstance();

        expect(instance.state.isActive).toBe(false)

        // changing  the state
        instance.handleClick();

     // isActive property is updated to `true`
        expect(instance.state.isActive).toBe(true);

        expect(tree.toJSON()).toMatchSnapshot()
    })
})
Now if you open your snapshot file you will see two snapshots.
// Jest Snapshot v1, https://goo.gl/fbAQLP


exports[`My first snapshot test testing app button 1`] = `
<div
  className="App"
>
  <button
    onClick={[Function]}
  >
    Show
  </button>
</div>
`;

exports[`Changing our button name to Hide toggle the button 1`] = `
<div
  className="App"
>
  <button
    onClick={[Function]}
  >
    Hide
  </button>
</div>
`;
Code coverage
Jest can collect code coverage information from entire projects, including untested files.
We can easily generate code coverage reports for our tests by adding the below script to our package.json file.
"test:coverage": "react-scripts test --coverage",Now in your terminal run npm run code:coverage

Have you seen our App component tests are (100%) fully covered?
- Share:


