Build an advanced blog using gatsby and react
In this tutorial, we are going to build a blazing speed gatsby blog with the seo,tags and many more.
Table of contents.
- Introduction to Gatsby
- Getting started with Gatsby
- Adding blog posts
- Display the posts list
- Creating the template for the blog posts
- Adding images
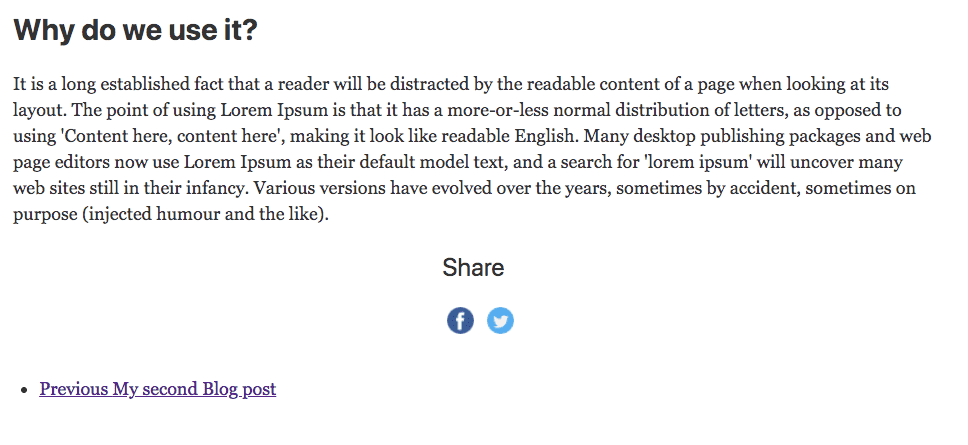
- Prev and next links
- Tags
- Seo in Gatsby
- Share icons
- Bonus
Introduction
What is a Gatsby.js?
- Gatsby.js is a static site generator for the react by using Gatsby we can build
any type of modern web apps.
-
The sites built with Gatsby are high performant and blazing speed.
-
Gatsby.js does the code splitting out of the box so that user can only download required data related to that page.
Why Gatsby?
- Gatsby has a rich plugin ecosystem.
- Future proof Jamstack websites.
- Everything is static.
- Code splitting out of the box.
- High performance.
- Secured
- Easy to deploy.
Getting started with Gatsby
Let’s set up a development environment for the blog we are building.
Nodejs is required for this project if you don’t have nodejs then go to nodejs.org and download the version which suits for your operating system. Once you installed then open your terminal and run node —v if the version number is shown then you are successfully installed.
Note: If you stuck in the middle of this tutorial, please refer to the Code repository.
Open your terminal and run below commands
npm install --global gatsby-cliIf you are using a mac then you need use sudo before the npm.
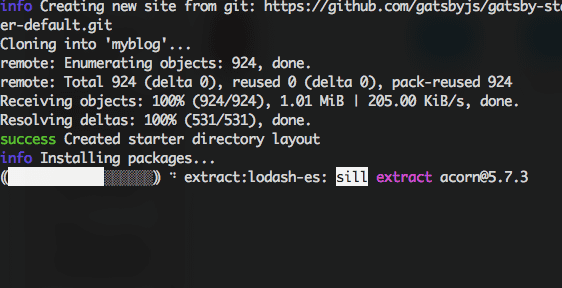
sudo npm install --global gatsby-cliOnce you successfully completed the above steps; now run the below command to download the gatsby default starter.
gatsby new myblog
change your current folder to the myblog folder by using below commands.
cd myblog
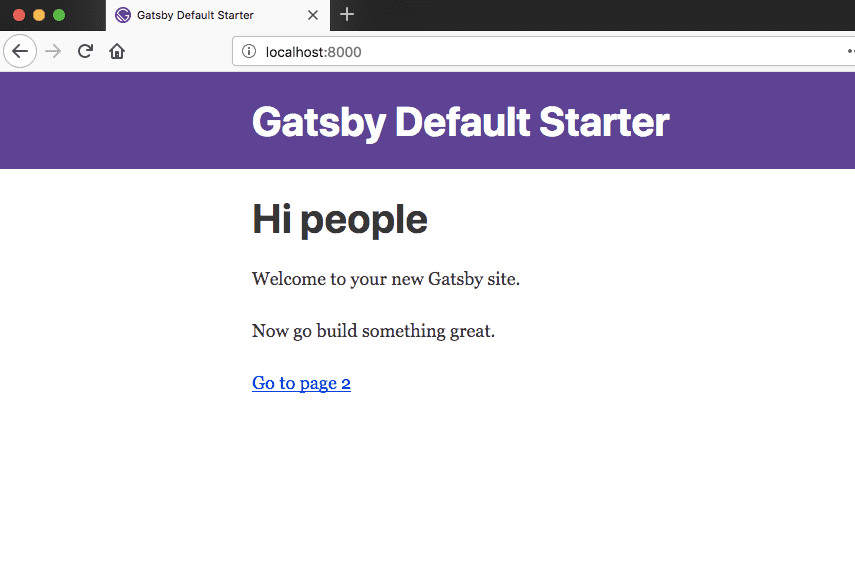
gatsby developgatsby develop is used to start the local development server by default gatsby uses the port 8000.
Now open your browser and type localhost:8000 you will see a gatsby index page.
Open the myblog folder in your favorite code editor.
Folder structure might look like these.
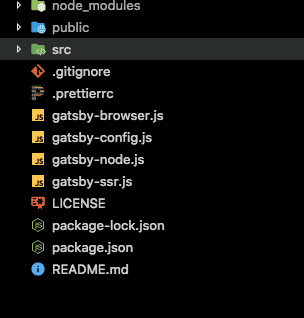
node_modules: The packages we are installed using the npm will live in a node_modules folder.
src: Main code lives in the src folder.
gatsby-browser.js: This file is related to the usage of any browser-related APIs provided by the gatsbyjs.
gatsby-node.js This file is related to the usage of any node related APIs provided by the gatsbyjs.
package.json: It shows which packages we are currently used in the project.
Adding blog posts
It’s time to create our first blog post with the help of Markdown.
Create a new folder called content As i showed in the below image.

- Create a
my-firstpost/index.mdfolder inside thecontentdirectory and
add the below content.
---
title: My first Blog post
description: This post is related to the gatsbyjs
date: '2018-12-2'
image: ''
tags: ['javascript','react','gatsby']
---
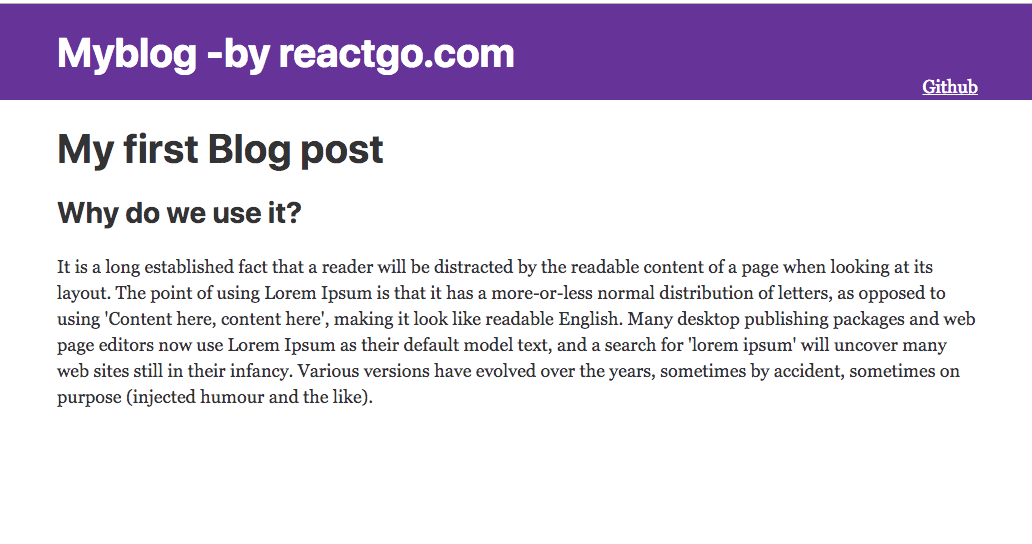
## Why do we use it?
It is a long established fact that a reader will be distracted by the readable content of a page when looking at its layout. The point of using Lorem Ipsum is that it has a more-or-less normal distribution of letters, as opposed to using 'Content here, content here', making it look like readable English. Many desktop publishing packages and web page editors now use Lorem Ipsum as their default model text, and a search for 'lorem ipsum' will uncover many web sites still in their infancy. Various versions have evolved over the years, sometimes by accident, sometimes on purpose (injected humor and the like).
we need to query this Markdown data by using the graphql for that first we need to install the two new plugins which help us to transform the Markdown data into the html format.
- gatsby transformer remark.
- gatsby-source-filesystem
npm install  gatsby-transformer-remark
npm install  gatsby-source-filesystem
Now we need to tell the Gatsby to use this two plugins.
Update your gatsby-config.js file with the below configuration.
module.exports = {
  siteMetadata: {
    title: 'Myblog - reactgo',
  },
  plugins: [
    'gatsby-plugin-react-helmet',
    {
      resolve: `gatsby-plugin-manifest`,
      options: {
        name: 'gatsby-starter-default',
        short_name: 'starter',
        start_url: '/',
        background_color: '#663399',
        theme_color: '#663399',
        display: 'minimal-ui',
        icon: 'src/images/gatsby-icon.png', // This path is relative to the root of the site.
      },
    },
    `gatsby-transformer-remark`,
    'gatsby-plugin-offline',
    {
      resolve: `gatsby-source-filesystem`,
      options: {
        path: `${__dirname}/content`,
        name: "pages",
      },
    },
  ],
}- Querying the blog data using
GraphiQL.
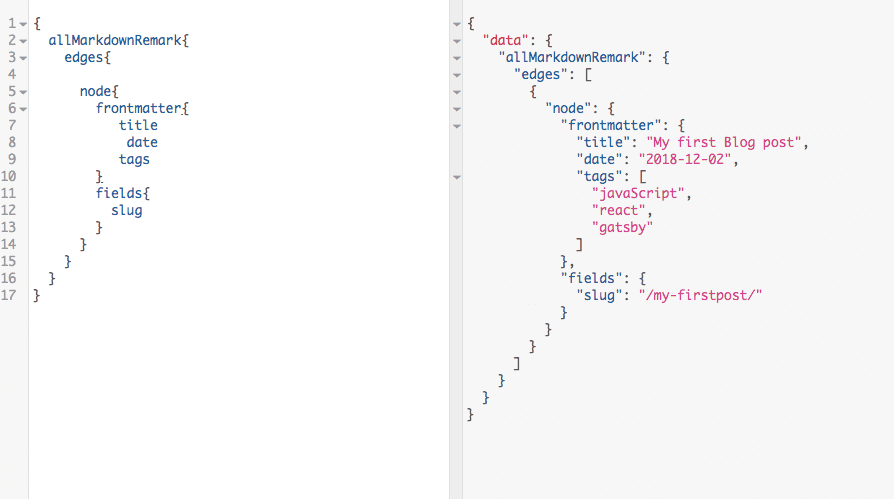
Restart your server by hitting ctrl+c and run gatsby develop, Open your browser and type http://localhost:8001/___graphql and copy the below query and paste it on the left side and
hit the play button.
{
  allMarkdownRemark{
    edges{
      node{
        frontmatter{
           title
            date
           tags
        }
      }
    }
  }
}
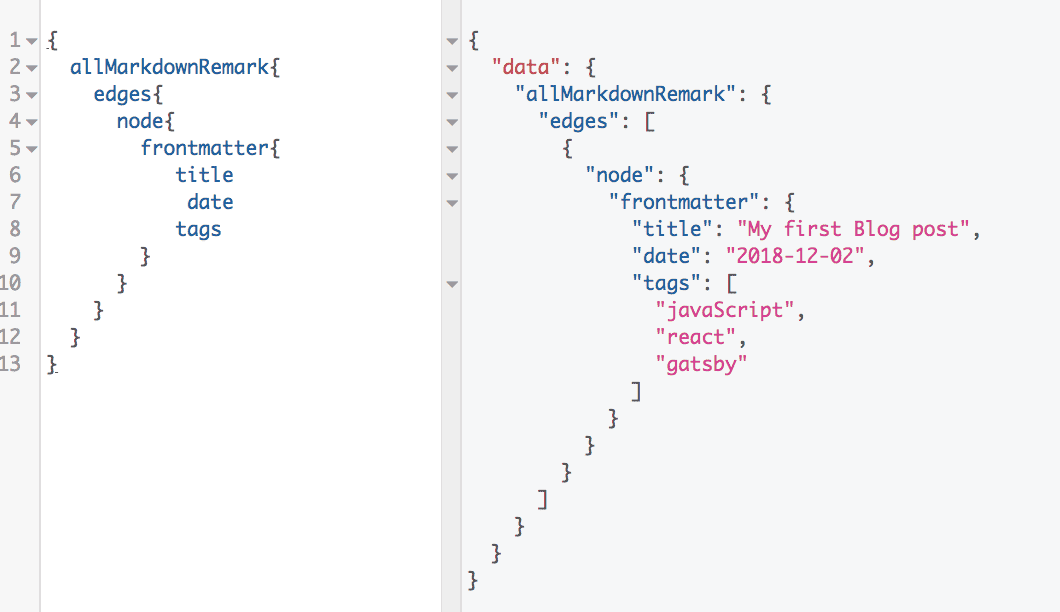
Have you seen the same data which we just added inside the myfirstpost/index.md file.
Next, we need to add a new field to our query which is a slug field. onCreateNode API allow us to create the new node fields.
const path = require("path")
const { createFilePath, createFileNode } = require(`gatsby-source-filesystem`);

exports.onCreateNode = ({ node, getNode, actions }) => {
    const { createNodeField } = actions
    if (node.internal.type === `MarkdownRemark`) {
        const slug = createFilePath({ node, getNode, basePath: `pages` })
        createNodeField({
            node,
            name: `slug`,
            value: slug,
        })

    }
}
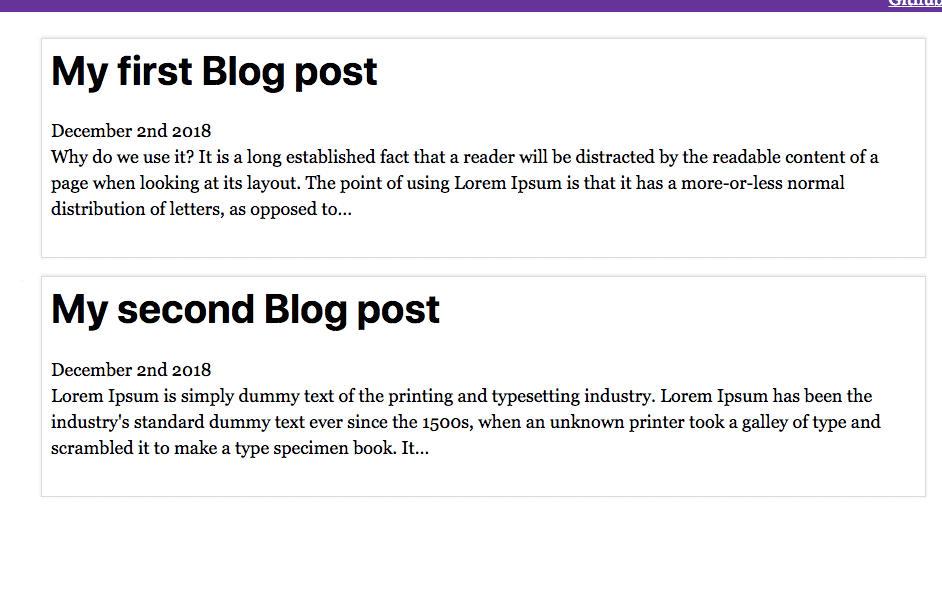
Display the Posts list
So far we are just querying the data by using GraphiQl, Now we are adding a query inside the pages/index.js page so that we can show the available blog posts on the main page of the site.
Open your pages/index.js file and add the below data.
import React from 'react'
import { Link, graphql } from 'gatsby'
import './post.css';
import Layout from '../components/layout'

const IndexPage = (props) => {
  const postList = props.data.allMarkdownRemark;
  return (
    <Layout>
      {postList.edges.map(({ node }, i) => (
        <Link to={node.fields.slug} key={i} className="link" >
          <div className="post-list">
            <h1>{node.frontmatter.title}</h1>
            <span>{node.frontmatter.date}</span>
            <p>{node.excerpt}</p>
          </div>
        </Link>
      ))}
    </Layout>
  )
}

export default IndexPage;

export const listQuery = graphql`
  query ListQuery {
    allMarkdownRemark(sort: { order: DESC, fields: [frontmatter___date] }) {
      edges {
        node {
          fields{
            slug
          }
          excerpt(pruneLength: 250)
          frontmatter {
            date(formatString: "MMMM Do YYYY")
            title
          }
        }
      }
    }
  }
`
We are sorting the blog posts based on the date.
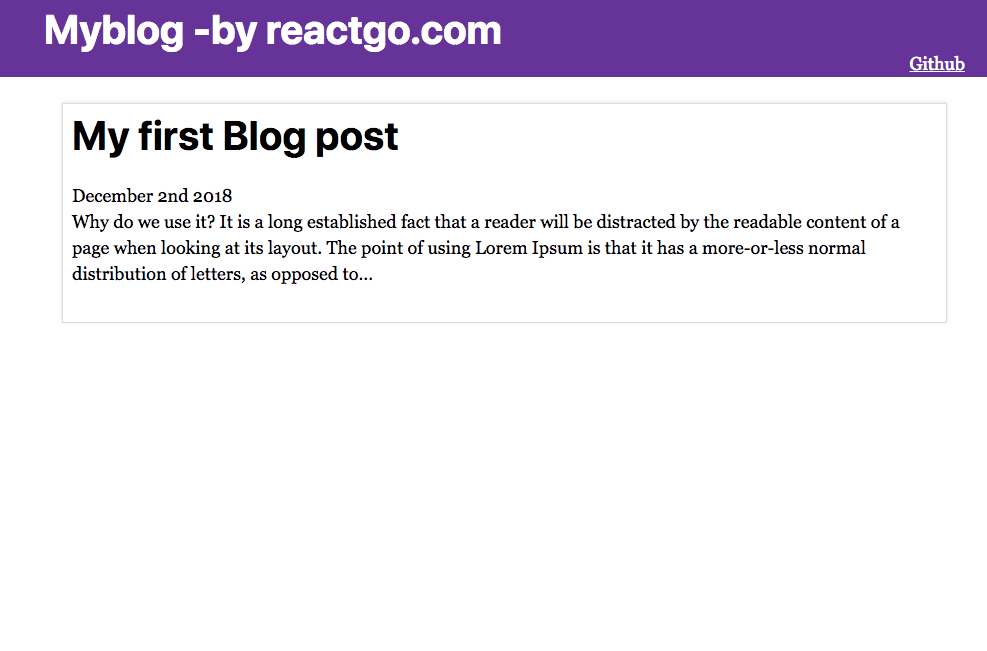
If you try to open that post you will see a broken link because we don’t have any templates to handle the blog-posts.
Creating the template for the blog posts.
Open the gatsby-node.js and replace the code with the below code which helps us to create the pages programmatically by using the same blog post template for the every blog post.
const path = require("path")
const { createFilePath, createFileNode } = require(`gatsby-source-filesystem`)
exports.createPages = ({ actions, graphql }) => {
const { createPage } = actions
const blogPostTemplate = path.resolve(`src/templates/blog-post.js`)
return new Promise((resolve, reject) => {
resolve(graphql(`
{
allMarkdownRemark(
sort: { order: DESC, fields: [frontmatter___date] }
limit: 1000
) {
edges {
node {
fields{
slug
}
frontmatter {
title
}
}
}
}
}
`).then(result => {
if (result.errors) {
console.log(result.errors)
return reject(result.errors)
}
const blogTemplate = path.resolve('./src/templates/blog-post.js');
result.data.allMarkdownRemark.edges.forEach(({ node }) => {
createPage({
path: node.fields.slug,
component: blogTemplate,
context: {
slug: node.fields.slug,
}, // additional data can be passed via context
})
})
return
})
)
})
}
exports.onCreateNode = ({ node, getNode, actions }) => {
const { createNodeField } = actions
if (node.internal.type === `MarkdownRemark`) {
const slug = createFilePath({ node, getNode, basePath: `pages` })
createNodeField({
node,
name: `slug`,
value: slug,
})
}
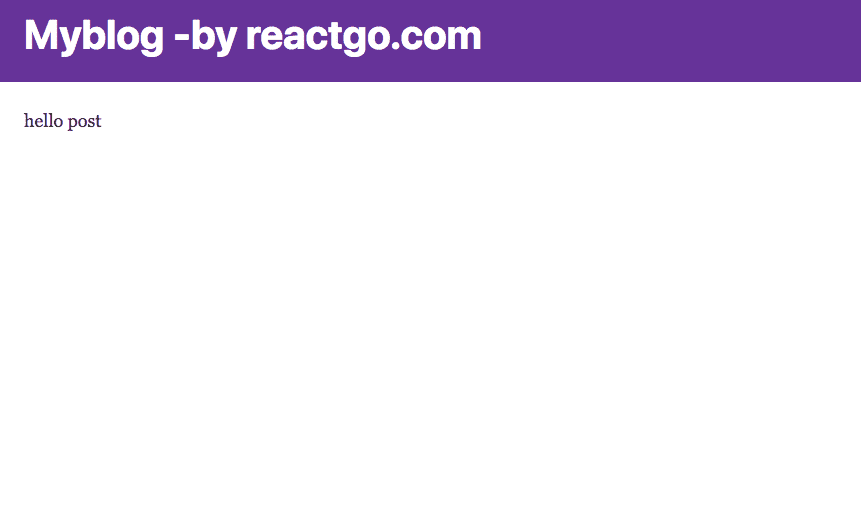
}Let’s create a blog post template.
import React from 'react';
import Layout from '../components/layout';

function BlogPost() {
    return (
        <Layout>
            <div>
                hello post
        </div>
        </Layout>
    )
}

export default BlogPost
Now delete .cache folder and run the gatsby develop
If you navigate over to the localhost:8000/my-fristpost you will see a Blog post template is rendered on the screen.
- Update the
blog-post.jstemplate by adding a query. - The data of this query is available to us in
props.data.
import React from 'react';
import Layout from '../components/layout';
import { graphql } from 'gatsby'

function BlogPost(props) {

    const post = props.data.markdownRemark;
    const { title,date } = post.frontmatter;

    return (
        <Layout>
            <div>
                <h1>{title}</h1>
                <div dangerouslySetInnerHTML={{ __html: post.html }} />
            </div>
        </Layout>
    )
}


export default BlogPost;

export const query = graphql`

query PostQuery($slug: String!) {
    markdownRemark(fields: { slug: { eq: $slug } }) {
        html
        excerpt
        frontmatter {
            title
        }
    }
}`
Let’s add a second post to our blog second-post/index.md inside the content directory.
---
title: My second Blog post
date: '2018-12-02'
image: ''
tags: ['javascript','react']
---

Lorem Ipsum is simply dummy text of the printing and typesetting industry.
Lorem Ipsum has been the industry's standard dummy text ever since the 1500s when an unknown printer took a galley of type and scrambled it to make a type
specimen book. It has survived not only five centuries, but also the leap into
electronic typesetting, remaining essentially unchanged. It was popularised in
the 1960s with the release of Letraset sheets containing Lorem Ipsum passages,
and more recently with desktop publishing software like Aldus PageMaker
including versions of Lorem Ipsum.

## Why do we use it?

It is a long established fact that a reader will be distracted by the
readable content of a page when looking at its layout. The point of using
Lorem Ipsum is that it has a more-or-less normal distribution of letters,
as opposed to using 'Content here, content here', making it look like readable
English. Many desktop publishing packages and web page editors now use Lorem Ipsum
as their default model text, and a search for 'lorem ipsum' will uncover many web
sites still in their infancy. Various versions have evolved over the years, sometimes
by accident, sometimes on purpose (injected humor and the like).
Restart the development server you will see two posts on the index page.
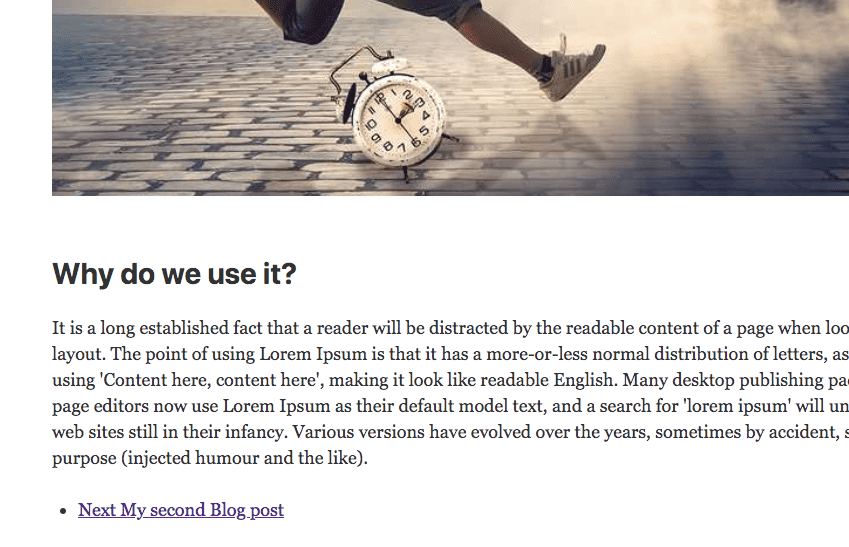
Adding images to the post
Gatsby offers us a different type of plugins to lazy load the images by adding a blur effect and also crop the images for the different device sizes.
It helps us to load the pages fastly.
How to add images to our blog?
we need to install the three plugins which are ‘transformer-sharp’, ‘plugin-sharp,gatsby-image’.
Run the below commands to install the three plugins.
npm install --save gatsby-transformer-sharp gatsby-plugin-sharp
npm install --save gatsby-image
Let’s add an image to our blog post.
---
title: My first Blog post
description: This post is related to the gatsbyjs
date: '2018-09-26'
image: time.jpg
---
time.jpg is present inside the my-firstpost folder.
we need to add a query for that image inside the blog-post.js template.
import React from 'react';
import Layout from '../components/layout';
import Img from 'gatsby-image';
import { graphql } from 'gatsby'

function BlogPost(props) {

    const post = props.data.markdownRemark;
    const { title} = post.frontmatter;

    return (
        <Layout>
            <div>
                <h1>{title}</h1>
                <Img fluid={post.frontmatter.image.childImageSharp.fluid} />
                <div dangerouslySetInnerHTML={{ __html: post.html }} />
            </div>
        </Layout>
    )
}


export default BlogPost

export const query = graphql`

 query PostQuery($slug: String!) {
     markdownRemark(fields: { slug: { eq: $slug } }) {
       html
       excerpt
       frontmatter {
        title
        image {
          childImageSharp {
            resize(width: 1500, height: 1500) {
              src
            }
            fluid(maxWidth: 786) {
              ...GatsbyImageSharpFluid
            }
          }
       }
       }
   }
}
`
Gatsby transformer sharp and plugin sharp are used to processing the images and produce the responsive images.
restart your development server you will see an image with the blur effect and faster load timing.

Prev and Next Links
Let’s add the previous post links and next post links at the bottom of the every post so that users can easily navigate to the next post or prev post.
Update the gatsby-config.js with the prev and next links
const path = require('path')
const { createFilePath, createFileNode } = require(`gatsby-source-filesystem`)


exports.createPages = ({ actions, graphql }) => {
    const { createPage } = actions

    return new Promise((resolve, reject) => {
        resolve(
            graphql(`
        {
          allMarkdownRemark(
            sort: { order: DESC, fields: [frontmatter___date] }
            limit: 1000
          ) {
            edges {
              node {
                fields {
                  slug
                }
                frontmatter {
                  title
                }
              }
            }
          }
        }
      `).then(result => {
                    if (result.errors) {
                        console.log(result.errors)
                        return reject(result.errors)
                    }

                    const blogTemplate = path.resolve('./src/templates/blog-post.js')
                    const posts = result.data.allMarkdownRemark.edges
                    posts.forEach(({ node }, index) => {
                        createPage({
                            path: node.fields.slug,
                            component: blogTemplate,
                            context: {
                                slug: node.fields.slug,
                                prev: index === 0 ? null : posts[index - 1],
                                next: index === result.length - 1 ? null : posts[index + 1],
                            }, // additional data can be passed via context
                        })
                    })
                    return
                })
        )
    })
}

exports.onCreateNode = ({ node, getNode, actions }) => {
    const { createNodeField } = actions
    if (node.internal.type === `MarkdownRemark`) {
        const slug = createFilePath({ node, getNode, basePath: `pages` })
        createNodeField({
            node,
            name: `slug`,
            value: slug,
        })
    }
}
Anything we passed inside the context object can be available inside every post as a
props.pageConext.
Let’s create a new component for handling the prev and next links.
import React from 'react'
const PrevNext = (props) => {

    const { prev, next } = props

    return (
        <ul>
            {prev && <li><a href={prev.fields.slug}>
                Previous {" "}
                {prev.frontmatter.title}</a></li>}
            {next && <li><a href={next.fields.slug}>
                Next  {" "} {next.frontmatter.title}

            </a></li>}
        </ul>
    )
}

export default PrevNext;
import that new component to the blog-post.js and update the
blog-post.js with the below code.
import React from 'react';
import Layout from '../components/layout';
import Img from 'gatsby-image';
import { graphql } from 'gatsby'
import PrevNext from '../components/prevnext';

function BlogPost(props) {

    const { title, image } = props.data.markdownRemark.frontmatter;
    const { prev, next } = props.pageContext;

    return (
    <Layout>
        <div>
            <h1>{title}</h1>
            {image && <Img fluid={image.childImageSharp.fluid} />}

            <div dangerouslySetInnerHTML={{ __html: props.data.markdownRemark.html }} />

            <PrevNext prev={prev && prev.node} next={next && next.node} />
        </div>
    </Layout>
    )
}


export default BlogPost

export const query = graphql`

 query PostQuery($slug: String!) {
    markdownRemark(fields: { slug: { eq: $slug } }) {
       html
       excerpt
       frontmatter {
        title
        image {
          childImageSharp {
            resize(width: 1000, height: 420) {
              src
            }
            fluid(maxWidth: 786) {
              ...GatsbyImageSharpFluid
            }
          }
        }
       }
   }
}
`
Now, delete .cache folder and restart your development server.
Tags
Tags help us to display the available posts on that particular tag so that users can browse the related content.
Let’s create a new template called tag-template.js.
import React from 'react';
import { Link, graphql } from 'gatsby'
import Layout from '../components/layout';
import '../pages/post.css'

function Tags(props) {
    const posts = props.data.allMarkdownRemark.edges;
    const { tag } = props.pageContext;
    return (
        <Layout>
            <h1>{`Available posts  in ${tag}`}</h1>
            <div className="tags">
                {
                    posts.map(({ node }, i) => (
                        <Link to={node.fields.slug} key={i} >
                            {node.frontmatter.title}
                        </Link>
                    ))
                }
            </div>
        </Layout>
    )
}


export default Tags;


export const query = graphql`

 query TagsQuery($tag: String!) {
allMarkdownRemark(
      limit: 2000
      sort: { fields: [frontmatter___date], order: DESC }
      filter: { frontmatter: { tags: { eq: $tag } } }
    ) {
      edges {
        node {
          frontmatter {
            title
          }
          fields {
            slug
          }
        }
      }
    }
}
`
Now we need to update the gatsby-node.js to use this template.
we are using the lodash to get the unique tags from the allPosts and programmatically creating pages for each tag.
const path = require('path')
const { createFilePath, createFileNode } = require(`gatsby-source-filesystem`)
const _ = require('lodash');

exports.createPages = ({ actions, graphql }) => {
    const { createPage } = actions

    return new Promise((resolve, reject) => {
        resolve(
            graphql(`
        {
          allMarkdownRemark(
            sort: { order: DESC, fields: [frontmatter___date] }
            limit: 1000
          ) {
            edges {
              node {
                fields {
                  slug

                }
                frontmatter {
                  title
                  tags
                }
              }
            }
          }
        }
      `).then(result => {
                    if (result.errors) {
                        console.log(result.errors)
                        return reject(result.errors)
                    }

   const posts = result.data.allMarkdownRemark.edges
   const blogTemplate = path.resolve('./src/templates/blog-post.js');
   const tagsTemplate = path.resolve('./src/templates/tag-template.js');

                    //All tags
                    let allTags = []
        // Iterate through each post, putting all found tags into `allTags array`
             _.each(posts, edge => {
            if (_.get(edge, 'node.frontmatter.tags')) {
                 allTags = allTags.concat(edge.node.frontmatter.tags)
             }
          })
                    // Eliminate duplicate tags
            allTags = _.uniq(allTags)

            allTags.forEach((tag, index) => {
                createPage({
                 path: `/${_.kebabCase(tag)}/`,
                component: tagsTemplate,
                context: {
                    tag,
                    }
                })
                })

            posts.forEach(({ node }, index) => {
                createPage({
                path: node.fields.slug,
                component: blogTemplate,
                context: {
                slug: node.fields.slug,
                prev: index === 0 ? null : posts[index - 1],
                next: index === result.length - 1 ? null : posts[index + 1],
                 },
               })
             })
            return
        })
        )
    })
}

exports.onCreateNode = ({ node, getNode, actions }) => {
    const { createNodeField } = actions
    if (node.internal.type === `MarkdownRemark`) {
        const slug = createFilePath({ node, getNode, basePath: `pages` })
        createNodeField({
            node,
            name: `slug`,
            value: slug,
        })
    }
}
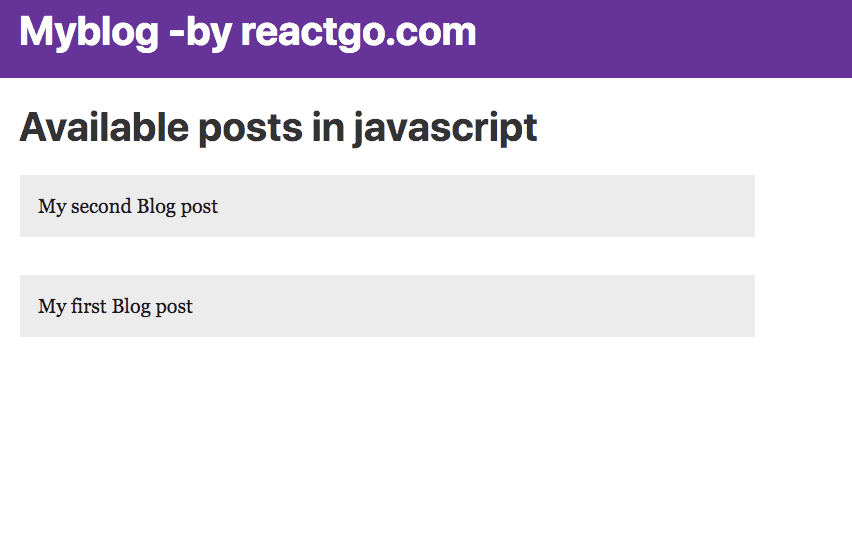
Display the tags
Let’s create one more page called tags.js which helps us to show the available tags.
import React from 'react';
import { Link, graphql } from "gatsby"
import Layout from '../components/layout';
import './post.css'

function TagsPage(props) {

    const data = props.data.allMarkdownRemark.group

    return (
        <Layout>
            <div className="tags">
                <h1>All tags</h1>
                {
                    data.map(tag => (
                        <Link to={`/${tag.fieldValue}`} >
                            {tag.fieldValue} {`(${tag.totalCount})`}
                        </Link>
                    ))
                }
            </div>
        </Layout>
    )

}

export default TagsPage;


export const pageQuery = graphql`
  query {
    allMarkdownRemark(
      limit: 2000) {
      group(field: frontmatter___tags) {
        fieldValue
        totalCount
      }
    }
  }

`
Now, open your browser and navigate to localhost:8000/tags you can see all available tags
which we added at the time of creating a blog post.
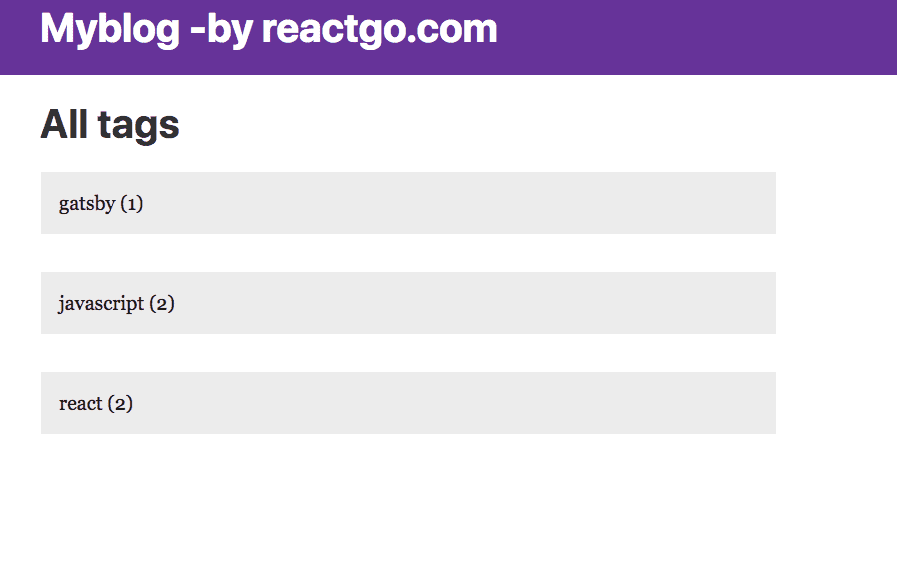
If you click any of those tags, you can see the available posts in that particular tag.
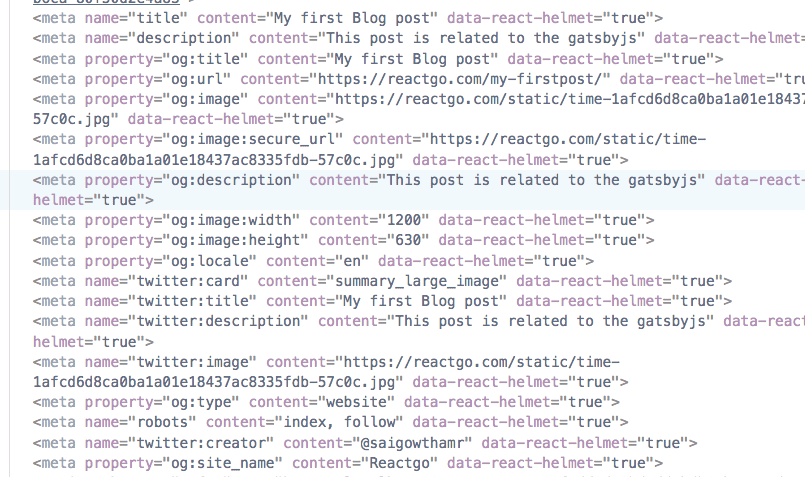
Seo in gatsby
Search engine optimization is very important to every site it’s bad behavior if we show the same title and description on every page of our site. we are using the react helmet library to control the meta tags in our pages.
Let’s create a new component for handling the meta tags so that we can reuse it whenever it’s is required.
Create a new file called Metatags.js in your components folder.
import React from 'react';
import Helmet from 'react-helmet'

function Metatags(props) {

    return (
        <Helmet
            title={props.title}
            meta={[
                { name: 'title', content: props.title },

                { name: 'description', content: props.description },
                {
                    property: 'og:title',
                    content: props.title,
                },
                {
                    property: 'og:url',
                    content: props.pathname ? props.url + props.pathname : props.url,
                },

                {
                    property: 'og:image',
                    content: props.thumbnail && props.thumbnail,
                },
                {
                    property: 'og:image:secure_url',
                    content: props.thumbnail && props.thumbnail,
                },

                {
                    property: 'og:description',
                    content: props.description,
                },

                {
                    property: 'og:image:width',
                    content: '1200',
                },

                {
                    property: 'og:image:height',
                    content: '630',
                },
                {
                    property: 'og:locale',
                    content: 'en',
                },
                { name: 'twitter:card', content: 'summary_large_image' },

                { name: 'twitter:title', content: props.title },

                {
                    name: 'twitter:description',
                    content: props.description,
                },
                {
                    name: 'twitter:image',
                    content: props.thumbnail && props.thumbnail,
                },
                { property: 'og:type', content: 'website' },
                { name: 'robots', content: 'index, follow' },

                { name: 'twitter:creator', content: '@saigowthamr' },
                { property: 'og:site_name', content: 'yoursitename' }
            ]}
        >
            <html lang="en" />
        </Helmet>
    )
}

export default Metatags;
Now we are ready to use this Metatags component inside the BlogPost template.
import React from 'react';
import Layout from '../components/layout';
import Img from 'gatsby-image';
import { graphql } from 'gatsby'
import PrevNext from '../components/prevnext';
import MetaTags from '../components/Metatags';


function BlogPost(props) {

    const url = props.data.site.siteMetadata.siteUrl
    const thumbnail = props.data.markdownRemark.frontmatter.image &&
          props.data.markdownRemark.frontmatter.image.childImageSharp.resize.src
    const { title, image } = props.data.markdownRemark.frontmatter;
    const { prev, next } = props.pageContext;

    return (
        <Layout>
            <MetaTags
                title={title}
                description={props.data.markdownRemark.excerpt}
                thumbnail={thumbnail && url + thumbnail}
                url={url}
                pathname={props.location.pathname}
            />
            <div>
                <h1>{title}</h1>
                {image && <Img fluid={image.childImageSharp.fluid} />}
          <div dangerouslySetInnerHTML={{ __html: props.data.markdownRemark.html }} />
                <PrevNext prev={prev && prev.node} next={next && next.node} />
            </div>
        </Layout>
    )
}


export default BlogPost

export const query = graphql`

 query PostQuery($slug: String!) {
    markdownRemark(fields: { slug: { eq: $slug } }) {
       html
       excerpt
       frontmatter {
        title
        image {
          childImageSharp {
            resize(width: 1000, height: 420) {
              src
            }
            fluid(maxWidth: 786) {
              ...GatsbyImageSharpFluid
            }
          }
        }
       }
   }
   site {
    siteMetadata {
        siteUrl
      }
   }
}
`
Let’s test it now by using Mozilla dev tools.
Share Icons
Let’s add the share icons to our blog post so that anyone can easily share our posts on the social media.
Create a new component called share.js inside the components folder.
import React from 'react'
import twitterIcon from '../images/twitter.png'
import fbIcon from '../images/facebook.png'
import './share.css'

const Share = props => {

    const twitter = `https://twitter.com/intent/tweet?url=${props.url +
        props.pathname}&text=${props.title} by @saigowthamr`;

    const fb = `https://www.facebook.com/sharer/sharer.php?u=${props.url +
        props.pathname}`;

    return (
        <div>
            <h3 className="center">Share</h3>
            <ul className="social">
                <li>
                    <a href={fb} target="blank">
                        <img src={fbIcon} alt="facebook" />
                    </a>
                </li>
                <li>
                    <a href={twitter} target="blank">
                        <img src={twitterIcon} alt="twitter" />
                    </a>
                </li>
            </ul>
        </div>
    )
}

export default Share;
import the share.js component inside the blog-post.js.
import React from 'react';
import Layout from '../components/layout';
import Img from 'gatsby-image';
import { graphql } from 'gatsby'
import PrevNext from '../components/prevnext';
import MetaTags from '../components/Metatags';
import Share from '../components/share';

function BlogPost(props) {

    const url = props.data.site.siteMetadata.siteUrl
    const thumbnail = props.data.markdownRemark.frontmatter.image &&
        props.data.markdownRemark.frontmatter.image.childImageSharp.resize.src
    const { title, image } = props.data.markdownRemark.frontmatter;
    const { prev, next } = props.pageContext;

    return (
        <Layout>
            <MetaTags
                title={title}
                description={props.data.markdownRemark.excerpt}
                thumbnail={thumbnail && url + thumbnail}
                url={url}
                pathname={props.location.pathname}
            />
            <div>
                <h1>{title}</h1>
                {image && <Img fluid={image.childImageSharp.fluid} />}
                <div dangerouslySetInnerHTML={{ __html: props.data.markdownRemark.html }} />
                <Share title={title} url={url} pathname={props.location.pathname} />
                <PrevNext prev={prev && prev.node} next={next && next.node} />
            </div>
        </Layout>
    )
}


export default BlogPost

export const query = graphql`

 query PostQuery($slug: String!) {
    markdownRemark(fields: { slug: { eq: $slug } }) {
       html
       excerpt
       frontmatter {
        title
        image {
          childImageSharp {
            resize(width: 1000, height: 420) {
              src
            }
            fluid(maxWidth: 786) {
              ...GatsbyImageSharpFluid
            }
          }
        }
       }
   }
   site {
    siteMetadata {
        siteUrl
      }
   }
}
`
Bonus
- Sitemaps in gatsby.
Gatsby has a plugin to generate the siteMaps based on the site content.
install a plugin called gatsby-plugin-sitemap.
npm install --save gatsby-plugin-sitemapUpdate the gatsby-config.js with this new plugin.
module.exports = {
  siteMetadata: {
    title: 'Myblog -by reactgo.com',
    siteUrl: 'https://reactgo.com',
  },
  plugins: [
    'gatsby-plugin-react-helmet',
    `gatsby-plugin-sharp`,
    `gatsby-transformer-sharp`,
    `gatsby-plugin-sitemap`,
    {
      resolve: `gatsby-plugin-manifest`,
      options: {
        name: 'gatsby-starter-default',
        short_name: 'starter',
        start_url: '/',
        background_color: '#663399',
        theme_color: '#663399',
        display: 'minimal-ui',
        icon: 'src/images/gatsby-icon.png', // This path is relative to the root of the site.
      },
    },
    `gatsby-plugin-catch-links`,
    'gatsby-plugin-offline',
    {
      resolve: `gatsby-transformer-remark`,
      options: {
        plugins: [
          `gatsby-remark-prismjs`,
        ]
      }
    },
    {
      resolve: `gatsby-source-filesystem`,
      options: {
        path: `${__dirname}/content`,
        name: "pages",
      },
    },
  ],
}
Note: The generated sitemaps will available at /sitemap.xml
Tags added to the each post
We need to add a one more field to the BlogPost query inside the blog-post.js
import React from 'react';
import Layout from '../components/layout';
import Img from 'gatsby-image';
import { graphql } from 'gatsby'
import PrevNext from '../components/prevnext';
import MetaTags from '../components/Metatags';
import Share from '../components/share';

function BlogPost(props) {

    const url = props.data.site.siteMetadata.siteUrl
    const thumbnail = props.data.markdownRemark.frontmatter.image &&
        props.data.markdownRemark.frontmatter.image.childImageSharp.resize.src
    const { title, image, tags } = props.data.markdownRemark.frontmatter;
    const { prev, next } = props.pageContext;
    return (
        <Layout>
            <MetaTags
                title={title}
                description={props.data.markdownRemark.excerpt}
                thumbnail={thumbnail && url + thumbnail}
                url={url}
                pathname={props.location.pathname}
            />
            <div>
                <h1>{title}</h1>
                {image && <Img fluid={image.childImageSharp.fluid} />}
                <div dangerouslySetInnerHTML={{ __html: props.data.markdownRemark.html }} />
                <div>
                    <span>Tagged in </span>
                    {tags.map((tag, i) => (
                        <a href={`/${tag}`} key={i} style={{ marginLeft: "10px" }} >{tag}</a>
                    ))}
                </div>
                <Share title={title} url={url} pathname={props.location.pathname} />
                <PrevNext prev={prev && prev.node} next={next && next.node} />
            </div>
        </Layout>
    )
}


export default BlogPost

export const query = graphql`

 query PostQuery($slug: String!) {
    markdownRemark(fields: { slug: { eq: $slug } }) {
       html
       excerpt
       frontmatter {
        title
        tags
        image {
          childImageSharp {
            resize(width: 1000, height: 420) {
              src
            }
            fluid(maxWidth: 786) {
              ...GatsbyImageSharpFluid
            }
          }
        }
       }
   }
   site {
    siteMetadata {
        siteUrl
      }
   }
}
`
Now you can see tags are rendered below on each post.
Happy coding…
- Share:


