Angular reactive forms tutorial
In this tutorial, we are going to learn about how to handle reactive forms data by using form controls and form group.
Reactive forms
Reactive forms using the immutable approach to managing the form state it means every time you change the form value you will get a new form state with the updated values.
Reactive forms are synchronous so that form state is predictable but template-driven forms are asynchronous and mutable.
Getting started
To create reactive forms first we need to import a ReactiveFormsModule from the
@angular/forms package and added it to imports array.
import { BrowserModule } from '@angular/platform-browser';
import { ReactiveFormsModule } from '@angular/forms';
import { NgModule } from '@angular/core';

import { AppComponent } from './app.component';

@NgModule({
  declarations: [
    AppComponent,
  ],
  imports: [
    BrowserModule, ReactiveFormsModule  ],
  providers: [],
  bootstrap: [AppComponent]
})
export class AppModule { }
Creating form controls
In reactive forms, we need to create a form control for each form element we have.
import { Component } from '@angular/core';
import { FormControl } from '@angular/forms';
@Component({
  selector: 'app-root',
  templateUrl: './app.component.html',
  styleUrls: ['./app.component.css']
})
export class AppComponent {
  //form control is created by invoking a FormControl constructor
  name = new FormControl('');
  constructor() {}
}
In the above code, first, we imported FormControl constructor from the @angular/forms package
and invoked it inside AppComponent by adding it to name property initial value.
Registering form control
Now we need to register the form control property with our form element present inside template by using formControl directive.
  <label for="name">Name</label>
  <input placeholder="Name" id="name" type="text" [formControl]="name" />
In the above code, we successfully created communication between form input value with formControl property so that any changes happens in model updates the view similarly any changes happen in view updates the model.
Accessing form element value
Inside the template, we can access the form element value by using form control name.
<label for="name">Name</label>
<input placeholder="Name" id="name" type="text" [formControl]="name" />
<p>{{name.value}}</p>
Grouping form controls
Suppose we have more than one form control in such cases we need to group them by using
FormGroup constructor.
We already learned that form control can track the state changes of the form element, by grouping form controls we can also track the whole form state changes in a form group.
Let’s create our form group now.
import { Component } from '@angular/core';
import { FormGroup, FormControl } from '@angular/forms';
@Component({
  selector: 'app-root',
  templateUrl: './app.component.html',
  styleUrls: ['./app.component.css']
})
export class AppComponent {
  //myform group contains two form controls name and email
    myform = new FormGroup({    name: new FormControl(''),    email: new FormControl('')  });
  constructor() {}
}
In the above code, we created our form group called myform with two form controls name and email.
Attaching form group to template
Let’s see how to bind a form group controls to our HTML template.
<form class="center" [formGroup]="myform">  <div class="group">
    <label for="name">Name</label>
      <input placeholder="Name" id="name" type="text"
      formControlName="name" />  </div>
  <div class="group">
    <label for="email">Email</label>
    <input placeholder="Email" id="email" type="email"
    formControlName="email" />  </div>
</form>
In the above code, i highlighted particular lines where myform group is added to the form element and
name and email controls are added to two input elements by using formControlName so that form group can track the state changes happen in input elements.
Submitting form and getting values
For form submission angular provides us a ngSubmit event property by using this we can submit a form to our backend.
<form class="center" [formGroup]="myform" (ngSubmit)="onSubmit()">  <div class="group">
    <label for="name">Name</label>
      <input placeholder="Name" id="name" type="text"
      formControlName="name" />
  </div>
  <div class="group">
    <label for="email">Email</label>
    <input placeholder="Email" id="email" type="email"
    formControlName="email" />
  </div>
<button type="submit">Submit</button></form>import { Component } from '@angular/core';
import { FormGroup, FormControl } from '@angular/forms';
@Component({
selector: 'app-root',
templateUrl: './app.component.html',
styleUrls: ['./app.component.css']
})
export class AppComponent {
myform = new FormGroup({
name: new FormControl(''),
email: new FormControl('')
});
constructor() {}
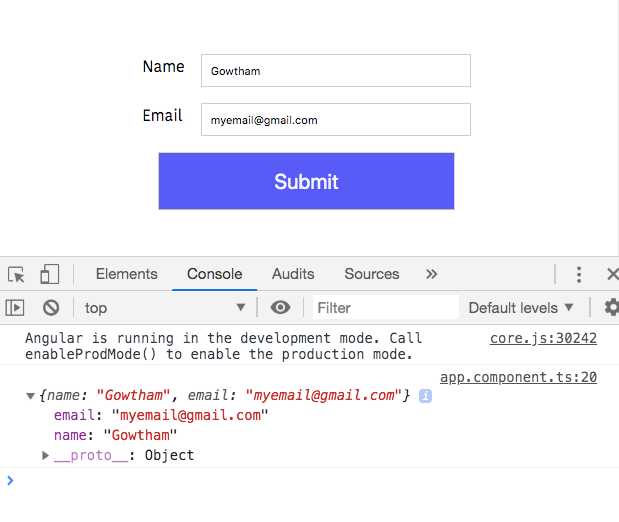
onSubmit() {
console.log(this.myform.value);
}
}Inside onSubmit method we can access the form control values by using form group myform.value property.
Note: Form submit event is triggered when we click on a submit button or by pressing the enter key.
Resetting form
we can also reset the form using reset
method provided by the form group.
 onSubmit() {
    console.log(this.myform.value);
this.myform.reset(); }- Share:


